https://chrome.google.com/webstore/detail/go-to-playing-tab/hmbhamadknmmkapmhbldodoajkcggcml/related?hl=en-US
Thursday, June 25, 2020
Chrome extension to locate music playing in a tab
https://chrome.google.com/webstore/detail/go-to-playing-tab/hmbhamadknmmkapmhbldodoajkcggcml/related?hl=en-US
Use Vive controller to control camera in Unreal engine
We can use the first person template in unreal to use a Vive controller to control camera in Unreal engine.
create a new project, choose games>first person template
once the template opens select your FirstpersonCharacter in the world outliner, and in the "pawn" dropdown turn the check on for:
Use controller rotation Yaw
Use controller rotation Pitch
Use controller rotation Roll


create a new project, choose games>first person template
once the template opens select your FirstpersonCharacter in the world outliner, and in the "pawn" dropdown turn the check on for:
Use controller rotation Yaw
Use controller rotation Pitch
Use controller rotation Roll

Then click edit FirstPersonController up in the world outliner to open the blueprints for it

Now in the components section in the top left you need to either child the main camera to one of the motion controllers if you are ok using that camera. Or in my case create a new cinecamera. Child it to the motion controller and delete the original camera.
If you delete the original camera. When you try to run you will get 3 errors in the compile, because the new camera isn't linked. Go ahead and run, then go back to edit FirstPersonController. You will see the errors in the compioler restults just click the link where it says "target" and it will take you to the problem node.

Now just drag your cinecamera into the Target field for each of hte erroring nodes. This will relink the camera in the three places it was deleted from.
Now run the app and you should be able to control the camera using a vive controller!
Wednesday, June 17, 2020
Add vray subdivision node to all selected objects in Maya MEL

Simply select all your geo, paste into the MEL script line in maya and hit enter!
{
string $sel[] = `ls -sl -dag -s`;
for ($each in $sel){
if (`nodeType $each`=="mesh"){
print ("// adding VRay subdivision attributes to "+$each+"\n");
vrayAddAttr($each, "vraySubdivEnable");
vrayAddAttr($each, "vraySubdivUVsAtBorders");
}
}
}
Alternatively, this tip from Raymond in the comments below. If you would like ONE vray subdivision node to effect all objects. Which is easier to control simply:
Select your objects, then: Create > VRay > VRay Displacement > Apply Single VRayDisplacement Node To Selection
Then on the VRayDisplacement node, in the Attribute Editor: Attributes > VRay > OpenSubDiv (or whatever you want)
Unity Oculus Quest VR anti-aliasing workaround, MSAA
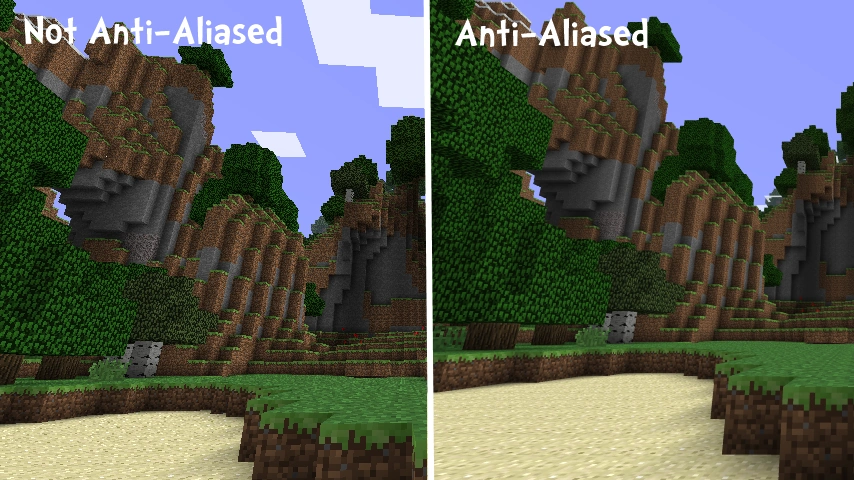
For some reason MSAA antialiasing doesn't seem to work when attempting to develop for the Oculus Quest. The setting simply has no effect. A workaround is to apply a very slight scaling effect via a little code. This really does work and softens those jaggy lines!
Just add a game object to your scene, add a custom C# script named "VRRenderScale" to it and replace it's contents with this code.
using UnityEngine;
using UnityEngine.XR;
public class VRRenderScale : MonoBehaviour {
void Start () {
XRSettings.eyeTextureResolutionScale = 1.5f;
}
}
It will effect performance if we increase it a lot. In my experience 1.5f was a pretty subtle effect. 2.5f was definitely noticeable but did decrease performance. In the end for the project I left it at 2.5f even though the frame rate descreased it still worked fine for my application.
Sketchup to vray maya, lightmapping then to Unity with original SKP textures.

Sketchup to vray maya, apply lightmapping then to Unity with original SKP textures.
1. From sketchup export an FBX
2. (IMPORTANT) In maya import the FBX, first thing to do is correct any texture path errors. I suggest running a script for maya called texture genie.
It also may be helpful to use the maya file path editor to copy ALL textures into one location this will simplify things later down the pipeline.
3. All the materials come in as PHONG, so unless you want that run this MEL script
string $replaceType = "lambert";
string $sNode[] = `ls -sl`;
for ($each in $sNode)
{
string $replaceWith = `createNode $replaceType`;
replaceNode $each $replaceWith;
delete $each;
rename $replaceWith $each;
}
Or if you prefer use this script to convert the phongs directly to vray maya
http://www.dryzen.com/scripts_mia2vray.html
4. Apply any bump maps etc and material adjustments as needed.
Now we need to prepare the items to maintain the original textures and UV's
5. Take careful note of the groups that came in from sketchup. Select each group and run a combine on each so that the contents of each group aka (a chair, a desk) each only have one model. These will be your light baking groups so you do not want these to be for instance a single door hinge you want it to be the entire door. Each group should represent a UV set texture for your light map.
6. After you have combined each group it's time to clean up the UV's. Sketchup UV's are going to be wonky and extending off the UV range but it still displays the texture map as it should . We want to leave that alone so select ALL your geomtry. You may need to go to maya menu>select>all by type>geo.
7.Now go to your UV in the UV set editor, there should just be a single UV1 set. With all your geo selected create a new UV set. And rename it to "lightmap"
8.Now make sure that lightmap UV set is selected, and ALL your GEO is selected. Then goto UV>automatic mapping in maya.
9. Now you will have a perfect second UV set for the light mapping to take place in.
10. Now it's time to set up the vray bake sets, these pretty much are just to define say sections at different resolutions. For instance the floor we want to bake at 4k, but the desks and chairs at 512pixels
11.Choose the GEO you want in a given bake set goto the Vray menu assign single vray bake options.

12. This will create a new node in your outliner with the texture bake size and settings. In the top you can select the UV set that will be used for the bake (where it says map1), choose your new lightmap UV set for all the bake groups that you create and set the resolution.

Once you have all your bake groups defined. this is VERY IMPORTANT. BEFORE you bake. Save your maya project as BEFORE BAKED. Once you do a bake on a set, vray will REMOVE the original materials, apply a surface shader with an image on it to the baked geo. This means you cannot simply change the lighting and bake the object again. A second bake will NOT change the way your object looks because it will simply bake what was already on it, leaving it the same.
So in order to make any changes to a section that you have baked, you will need to revert back that section to the prebaked setup project.
Alright now Bake away!
13. Once the bake is completed, it's time to bring it into unity!
14. Select your entire model in maya and export to FBX. trying to use "embed textures" didn't work for me, I think due to the size of all the textures. It would simply generate an FBX with no FBM texture folder. To get around this, since all the textures are now located on a single folder anyway (because of our cleanup). I just copied it into the same folder as the FBX.
15. Now in unity just plop your model and it's textures into your project folder and it will import everything. It's somewhat likely it won't use the correct UV set and the textures will look wacked. If this happens in the unity model settings just choose swap UV and that should fix it.

That's it you should now have a Vray baked model in unity!
Syntheyes alexa anamorphic lens mapping and using the distortion profile in After Effects.
First let's create a map for the lens.
This will allow us to use that distortion file in after effects to undistort the plate, or DISTORT our CG elements into that footage.
1. IMAGE MAP the lenses:
Import a still frame of the your lens charts into syntheyes at the focus distance you are seeking to map. You could name the frame something like 50mm_10ft for the focus distance of that particular chart.
You would want to create an image map
Make sure that all the settings are correct for the footage import, resolution, film back size, here are my settings for alexa mini shot with open gate 3.4k anamorphic
Look up the correct back plate size for the shooting mode and anamorphic squeeze on the camera and set it here.

Now let's go to SYNTHEYES.
Top right bar of syntheyes right click say add room, type panel FLEX and make it FLEX

Now go to the FLEX panel
select "new curve" and lay curves out on the lens chart. As many as needed to feel like you are approximating the distortion properly.
Once you have them all laid out it's time to export your image distortion maps
EXPORTING MAPS
Menu
Script>lens>lens master calibration
It will pull up the lens export dialogs


In my workflow I will be working with distorted footage and then distorting CG elements into it in After effects so I would choose workflow 2
recentering: Padding
preset type image preprocessor
Margin
image map type: PNG is fine.
Using them in AFTER EFFECTS
Open up your After Effects project with your anamorphic footage.
Import the new image maps, they should be stored with the image file you used to make the distortion map from.
1. Once imported, goto interpretation on them and PRESERVE RGB in color management for the maps, and change the aspect ration to anamorphic 2:1
2. Drop your image map into the comp. Now search for Syntheyes Image Mapper in your effects. drop that ON your image distortion map. NOT on the precomp or image you want to distort/undistort.
3. In the effect settings for Syntheyes Image Mapper, set image to map to the layer or precomp you want to distort/undistort. NOTE that you will NOT be able to any other effects on THAT layer or precomp.
This will allow us to use that distortion file in after effects to undistort the plate, or DISTORT our CG elements into that footage.
1. IMAGE MAP the lenses:
Import a still frame of the your lens charts into syntheyes at the focus distance you are seeking to map. You could name the frame something like 50mm_10ft for the focus distance of that particular chart.
You would want to create an image map
Make sure that all the settings are correct for the footage import, resolution, film back size, here are my settings for alexa mini shot with open gate 3.4k anamorphic
Look up the correct back plate size for the shooting mode and anamorphic squeeze on the camera and set it here.

Now let's go to SYNTHEYES.
Top right bar of syntheyes right click say add room, type panel FLEX and make it FLEX

Now go to the FLEX panel
select "new curve" and lay curves out on the lens chart. As many as needed to feel like you are approximating the distortion properly.
Once you have them all laid out it's time to export your image distortion maps
EXPORTING MAPS
Menu
Script>lens>lens master calibration
It will pull up the lens export dialogs

At the top you want to name your profile in this case it was a 28mm anamorphic at 30ft focus distance. Now Select "straighten lines", the lens type in my case "anamorphic".
Now here you can try a couple of the different distortion types, and see which gives you the least hpix error, once you compute the image map. Just run one and undo then try another one to see how high the hxip is. The lower the better. Cubic was working best for me.
Lens radius I believe is supposed to be set to half the aspect ratio so in my case 1/2 of 2.0 pixel would be 1.
Press ok to move to the next step.
Press ok to move to the next step.
I also press field of view estimator
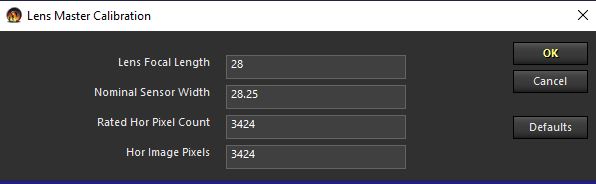
The lens was a 28mm so I put that in and put in the exact sensor back width.
press ok

Leave this next box as is.^

recentering: Padding
preset type image preprocessor
Margin
image map type: PNG is fine.
Using them in AFTER EFFECTS
Open up your After Effects project with your anamorphic footage.
Import the new image maps, they should be stored with the image file you used to make the distortion map from.
1. Once imported, goto interpretation on them and PRESERVE RGB in color management for the maps, and change the aspect ration to anamorphic 2:1
2. Drop your image map into the comp. Now search for Syntheyes Image Mapper in your effects. drop that ON your image distortion map. NOT on the precomp or image you want to distort/undistort.
3. In the effect settings for Syntheyes Image Mapper, set image to map to the layer or precomp you want to distort/undistort. NOTE that you will NOT be able to any other effects on THAT layer or precomp.
Wednesday, June 10, 2020
Maya export FBX problem, no .fbm folder or textures when selecting embed media

Problem: When trying to do a Maya FBX export the .fbm folder never appears, and of course neither do it's textures when exporting with "Embed Media". Furthermore, all the textures are NOT embedded in the FBX file itself. Leaving you without proper textures.
Workaround:
Option 1: Copy all your textures into one spot using the repath in the filepath editor. So that they are in one location. To open the File Path Editor, select Windows > General Editors > File Path Editor. In my case this actually still managed to break my textures because of some strange naming issues involving underscores. But it may work for you.
Option 2: Use the File Path Editor to visually see each folder where your textures are spread and manually copy them all into the same folder.
Now you can simply export an FBX WITHOUT "embed media" selected. And you have your textures in one location.
I believe this problem is due to some larger projects with many textures involved such as lightmap baking.
Friday, June 5, 2020
Maya Back Faces Black - Reverse Normals Doesn't Work
Make sure the Vertex normals aren't locked:
Choose your problem vertexes, then:
Mesh Display > Unlock normals
Then try to flip the normals again:
Go to face mode and select the dark faces then in the top menu go to Mesh Display and under the "Normals" category click reverse
AND/OR
Choose: mesh display > set to face, which usually fixes the reversed normals while also leaving the normals which are fine
If reversing the normals doesn't work, your vertexes are probably locked. Select problem vertexes and go to:
Mesh Display > Unlock normals
You could also try: Shift+RMB go to the bottom and reset normal settings
References:
https://www.reddit.com/r/Maya/comments/51ajr5/why_does_my_objectface_turn_black/
https://www.reddit.com/r/Maya/comments/ab2zfb/imported_object_has_reversed_normals_cannot/
Subscribe to:
Posts (Atom)