Search Maya Zest


Showing posts with label Maya. Show all posts

Wednesday, September 30, 2020

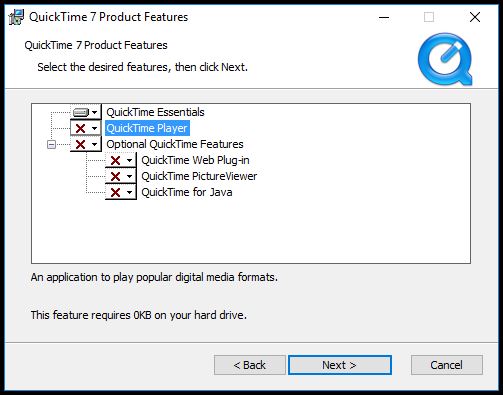
Quicktime playblast option not available in maya

Just install the codec and don't bother with the QT player itself. Then restart maya and it should show up now.

https://support.apple.com/kb/DL837?locale=en_US


Thursday, July 2, 2020

Can't save maya project due to unknown nodes


If you are not able to save your maya project due to unknown nodes, here is a simple script to delete them. Change your script type to Python in the bottom script bar and paste this script.


import maya.cmds as cmds
cmds.delete(cmds.ls(type="unknown"))


Hit enter! now you should be able to save your project again!

Wednesday, June 17, 2020

Add vray subdivision node to all selected objects in Maya MEL


Here is a little MEL code snippet to add an individual vray subdivision node to each of your selected objects in Maya.

Simply select all your geo, paste into the MEL script line in maya and hit enter!


{
string $sel[] = `ls -sl -dag -s`;
for ($each in $sel){
 if (`nodeType $each`=="mesh"){ 
  print ("// adding VRay subdivision attributes to "+$each+"\n");
  vrayAddAttr($each, "vraySubdivEnable");
  vrayAddAttr($each, "vraySubdivUVsAtBorders");
 }
}
}


Alternatively, this tip from Raymond in the comments below. If you would like ONE vray subdivision node to effect all objects. Which is easier to control simply:

Select your objects, then: Create > VRay > VRay Displacement > Apply Single VRayDisplacement Node To Selection

Then on the VRayDisplacement node, in the Attribute Editor: Attributes > VRay > OpenSubDiv (or whatever you want)

Sketchup to vray maya, lightmapping then to Unity with original SKP textures.


Sketchup to vray maya, apply lightmapping then to Unity with original SKP textures.

1. From sketchup export an FBX

2. (IMPORTANT) In maya import the FBX, first thing to do is correct any texture path errors. I suggest running a script for maya called texture genie.

It also may be helpful to use the maya file path editor to copy ALL textures into one location this will simplify things later down the pipeline.

3. All the materials come in as PHONG, so unless you want that run this MEL script

string $replaceType = "lambert";
string $sNode[] = `ls -sl`; 
for ($each in $sNode)
    {
    string $replaceWith = `createNode $replaceType`;
    replaceNode $each $replaceWith;
    delete $each;
    rename $replaceWith $each;
    }


Or if you prefer use this script to convert the phongs directly to vray maya
http://www.dryzen.com/scripts_mia2vray.html

4. Apply any bump maps etc and material adjustments as needed.

Now we need to prepare the items to maintain the original textures and UV's

5. Take careful note of the groups that came in from sketchup. Select each group and run a combine on each so that the contents of each group aka (a chair, a desk) each only have one model. These will be your light baking groups so you do not want these to be for instance a single door hinge you want it to be the entire door. Each group should represent a UV set texture for your light map.

6. After you have combined each group it's time to clean up the UV's. Sketchup UV's are going to be wonky and extending off the UV range but it still displays the texture map as it should . We want to leave that alone so select ALL your geomtry. You may need to go to maya menu>select>all by type>geo.

7.Now go to your UV in the UV set editor, there should just be a single UV1 set. With all your geo selected create a new UV set. And rename it to "lightmap"

8.Now make sure that lightmap UV set is selected, and ALL your GEO is selected. Then goto UV>automatic mapping in maya.

9. Now you will have a perfect second UV set for the light mapping to take place in.

10. Now it's time to set up the vray bake sets, these pretty much are just to define say sections at different resolutions. For instance the floor we want to bake at 4k, but the desks and chairs at 512pixels

11.Choose the GEO you want in a given bake set goto the Vray menu assign single vray bake options.


12. This will create a new node in your outliner with the texture bake size and settings. In the top you can select the UV set that will be used for the bake (where it says map1), choose your new lightmap UV set for all the bake groups that you create and set the resolution.


Once you have all your bake groups defined. this is VERY IMPORTANT. BEFORE you bake. Save your maya project as BEFORE BAKED. Once you do a bake on a set, vray will REMOVE the original materials, apply a surface shader with an image on it to the baked geo. This means you cannot simply change the lighting and bake the object again. A second bake will NOT change the way your object looks because it will simply bake what was already on it, leaving it the same.

So in order to make any changes to a section that you have baked, you will need to revert back that section to the prebaked setup project.

Alright now Bake away!

13. Once the bake is completed, it's time to bring it into unity!

14. Select your entire model in maya and export to FBX. trying to use "embed textures" didn't work for me, I think due to the size of all the textures. It would simply generate an FBX with no FBM texture folder. To get around this, since all the textures are now located on a single folder anyway (because of our cleanup). I just copied it into the same folder as the FBX.

15. Now in unity just plop your model and it's textures into your project folder and it will import everything. It's somewhat likely it won't use the correct UV set and the textures will look wacked. If this happens in the unity model settings just choose swap UV and that should fix it.


That's it you should now have a Vray baked model in unity!


Wednesday, June 10, 2020

Maya export FBX problem, no .fbm folder or textures when selecting embed media


Problem: When trying to do a Maya FBX export the .fbm folder never appears, and of course neither do it's textures when exporting with "Embed Media". Furthermore, all the textures are NOT embedded in the FBX file itself. Leaving you without proper textures.

Workaround: 
Option 1: Copy all your textures into one spot using the repath in the filepath editor. So that they are in one location. To open the File Path Editor, select Windows > General Editors > File Path Editor. In my case this actually still managed to break my textures because of some strange naming issues involving underscores. But it may work for you.

Option 2: Use the File Path Editor to visually see each folder where your textures are spread and manually copy them all into the same folder.

Now you can simply export an FBX WITHOUT "embed media" selected. And you have your textures in one location.

I believe this problem is due to some larger projects with many textures involved such as lightmap baking.

Tuesday, November 12, 2019

Export Maya Camera to After Effects


The easy way would be to use Adobe After Effects Live Link but if you have an older version of maya that may not be an option for you. :)

First in Maya.

1. Name camera starting with "Cam"

2. Name nulls you want to carry over Null_1,Null_2 etc


3. Change the maya scene to mm

(Make sure you don't save OVER your maya project after changing to mm it may screw up things.)

4. Save your scene before baking the keyframes. Then select the camera and nulls and bake them for the duration of the animation.

5. Select those items and export select as .ma

6. Then just import the .ma into after effects!


Tuesday, November 5, 2019

Maya proper way to do overscan

Proper location to do overscan in maya.

DO NOT use prescale or post scale, use the Camera Scale setting.

Simply decide what percentage you want overscan. In my case 33% Then take your original NON overscan size in render settings multiply it by 1.33 (in my case) and that is your new overscan render dimensions.

If you need to offset in a direction (for instance to only have overscan on the top. you can use the Film offset setting.


Thursday, August 29, 2019

Apply subdivision node to all selected vray for maya objects

As you may know you have to apply a subdivision node to vray maya objects in order to render subd surfaces. You can do this manually per object but that could take a very long time if you have a lot.

So go to maya menu select>objects by type>geometry

to select all the objects in your scene. then paste this into the MEL port of your script editor and hit enter.

Boom they will all have the subD node now!


{
string $sel[] = `ls -sl -dag -s`;
for ($each in $sel){
if (`nodeType $each`=="mesh"){
print ("// adding VRay subdivision attributes to "+$each+"\n");
vrayAddAttr($each, "vraySubdivEnable");
vrayAddAttr($each, "vraySubdivUVsAtBorders");
}
}
}


You could modify other attributes like the subD count etc by using commands at the end.

Friday, September 1, 2017

MEL Code to change filter type of all your images/textures (MAYA)

Sometimes you might want to turn of the texture filtering for ALL textures or ALL SELECTED textures in your maya project. This is because the default filtering method (quadratic) can lead to very soft or smudgy textures.

Paste one of these scripts into your script editor with MEL selected. Then highlight the code snippet and press the play button to execute.


// Sets filter type to "Off" on ALL file textures

string $fileList[] = `ls -type "file"`;
for ($file in $fileList){
       
        setAttr ($file + ".filterType") 0;
             
}


// Sets filter type to "Off" on selected file textures

string $fileList[] = `ls -sl -type "file"`;

for ($file in $fileList){
       
        setAttr ($file + ".filterType") 0;
             
}

Wednesday, July 27, 2016

Select every other edge loop on your model (maya)


1. Make sure your script panel in the bottom is set to MEL

2. Select your edge selection tool and highlight one edge in your object. Double click to get the entire loop.

3. Once that loop is selected drop this code snippet in your script editor and hit enter

polySelectEdgesEveryN "edgeRing" 2;

It should select every other loop in your model.

Create a geodesic dome in maya


I recently had a project where I needed to create a dome in maya with precise angles and what not. Here is how to quickly make Geodesic domes in maya.

In the Maya menus

create>polygon primative>platonic solids

To make a 36 foot dome set radius to 18
set to icosahedron
choose collectively


smooth linearly
devision levels 1
divisions per face 3
push strength 0
roundness 10

Wednesday, January 6, 2016

Tips for working with Maya goleam 3.4

1. how to "fix" goleam character alpha channel when using a dome light. (appears that crowd has no alpha channel. You are actually seeing the dome alpha.

If you are using a vray dome light then it will appear that the alpha isn't working with the crowd. Make the dome invisible and then you will see it was just getting filled in with white.


2. Vray maya fix the hair issue in goleam material (hair has strange super bright highlights)

select the hair blinn shader. in attributes editor fold out "raytrace options"  and set Reflection limit to 0 or in the vray shader under reflections turn off trace reflections


3. Set goleam to matching scale in maya 
leave maya set to cm

set goleam to cm from the meters it defaults to in crowdmanagernode

then go to your crowd field node and set simulation scale to 100.

This is what you would do in the case of scanning a stadium with a lidar.
exporting from SCENE to e57>

4. IF trying to use nav mesh these settings MAY be helpful. Per face population works better for stadiums

.1Settings for navmesh

combine, delete history for object

trianglulate

Rasterization Voxel

Length2.0mu

Height 2. mu

.66
.16
1.54
45

uncheck "Keep Only greatest Connex Zone" in the advanced perameters tab

and delete


5. Setting up vray and goleam on Backburner

If you want BB to see vray you have to do a full install of vray on each slave. not just a standalone install.


BAT to run BB

@echo off

rem ################## Golaem Crowd
set GLM_CROWD_HOME=C:\Golaem\GolaemCrowd_351_Maya2015

rem ################## Autodesk Maya
set MAYA_HOME=C:\Program Files\Autodesk\Maya2015
set MAYA_VERSION=2015
set MAYA_MODULE_PATH=%GLM_CROWD_HOME%;%MAYA_MODULE_PATH%

rem ################## System
set PATH=%GLM_CROWD_HOME%\bin;%PATH%;%SystemRoot%;%SystemRoot%\system;

rem ################## V-Ray
set VRAY_PLUGINS_x64=%GLM_CROWD_HOME%\procedurals;%VRAY_PLUGINS_x64%
set VRAY_FOR_MAYA2015_PLUGINS_x64=%GLM_CROWD_HOME%\procedurals;%VRAY_FOR_MAYA2015_PLUGINS_x64%
set VRAY_FOR_MAYA_SHADERS=%GLM_CROWD_HOME%\shaders;%VRAY_FOR_MAYA_SHADERS%

rem ################## Launch Maya with the right configuration
start /d "C:\Program Files (x86)\Autodesk\Backburner" server.exe


6. populate per face seating in goleam
First create your entity type node (icon of orange and white guy)

select your crowdman.gskm

select your object , select to choose faces, select all faces

then ctrl click the population tool in the tools attributes panel select create particles on selected components

set crowd manager node to cm

goto pop tool and set reius again you should now see the green particle indicators.


Thursday, December 10, 2015

Delete Floating or "winged" Vertex in maya.

Often in maya when modeling you can end up with floating "or winged vertex. Simply object select the mesh you need to clean up


type polyDelVertex in the MEL box at the bottom of maya and hit enter. This should clean up any floating vertexes and leave the good ones.

Tuesday, November 17, 2015

Creating dynamic clouds in fumefx and vray for maya

So you want to create some slick clouds in FumeFX for MAYA?


Basic steps of the tutorial:

1. Generate polygon cloud geometry using displaced noise on a group of combined spheres to get a nice broken up cloud shape.

2. Convert the displacement to polygons via modify>convert displacement to polygons.

3. Reduce the resulting polygon mesh to something manageable (100k polys or less)

4. Use the resulting object as a fume fx emitter.


1.First make a a collection of spheres either manually or using this cloud creation plugin. Basically we just want a cluster of spheres that is roughly the shape of our cloud. Make sure there are both large and small spheres sprinkled about for good variation.


(If you use the spheres plugin it will generate nurbs and you will have to convert them to polys and then reduce it's poly count before use. )

UPDATE: Another cool way I just discovered to get your base cloud starting shape is to use maya fluids with a texture from my maya fluid clouds tutorial. on how to create maya fluid clouds. This actually works amazingly well!!! Then once you have a cloud shape you like simply go to modify>convert fluid to polygons).  If you do this SKIP TO STEP 4.

2. Once you have a combined shape that is a single object of spheres apply a lambert material (reason for this is we are going to convert the displacement to polys and you can't do this if it's a vray material)

3. In your hyper shade create a displacement node. default click and drag a noise node onto your lambert material and Select displacement. Then create a noise node and middle drag it to the displacement node. (REMEMBER MAYA DISPLACEMENT IS BASED ON OBJECT SCALE. if you have a large object you may not see your displacement. To remedy this select your displacement file node. Color balance and turn up the alpha gain setting till you see the displacement. Then you can refine the displacement smoothness and resolution by selecting the object you are displacing There should now be a Displacement Map drop down in the attributes for it. The vray displacement settings will NOT work anymore.)

If you try and use a fractal to drag onto the displacement node by default it will attach the alpha channel out and you won't get any effect. You can fix this by middle mouse clicking and disconnecting the alpha and attaching just one channel of R,G or B to the displacement node.

3. Now set your renderer to IPR so we can see real time updates of the displacement changes (make sure to turn on displacement in the Vray RT renderer) and start tweaking the noise parameters and UV mapping settings on your object. What we want is a big lump shape with small details and large billow details at the same time. you don't want ONLY either of those you want both.

This is going to effect the look of your clouds quite alot. If you have to many large smooth areas they will show up, if you have to small of details they will disappear into them ass and not be visible.


4. Once you have a shape you like. go to modify menu > convert displacement to polygons.

It may take a few minutes. The resulting object will probably be really polygon heavy. Go to mesh menu>reduce> settings square. Set it to 50% (or higher if you wish and reduce the obejct a couple times. Something below 100k polys or less should be good.

5. Now make your fume FX container select it then shift select your object and turn it into a object emmiter with the fume fx icon.

Now for the golden mojo cloud mix.
I don't have it perfect but after some experimentation I've come up with a decent recipi. use these fume


6. On your object emitter source attributes to source type volume. and turn the smoke amount up to 10.


On your emmiter source also change turbulence to these values:
Velocity
Object - 1 (doesn't matter)
Extra - .001 (for very slight cloud expansion over time, if this is set to 0 you will have a perfectly static cloud.)


Turbulence
Amount .5
Scale 10
Frames 3


7. Then use these settings in your fume FX container. I'm only mentioning the ones. Turn off fuel.


GENERAL PARAMETERS:
Spacing .3 (work it down to .2 later)

Set your container size toe contain your object and set it to adaptive.

SIMULATION:GENERAL
leave as default

SIMULATION:SYSTEM
Gravity .1
Vorticity .5
Velocity Damping 0
X turb .9
Y turb .1
Z turb .5

SIMULATION: TURBULENCE NOISE
Scale 2
Frames 10
Detail 2

SIMULTION:SMOKE
Simulate Smoke : ON
Smoke Boyancy .2
Dissipation Min Dens 10
Dissipation strength .1
Diffusion 0

Additional smoke rendering settings.


Lastly in  illumination> illumination map set multiplier to 4. (this is from the fume fx vray maya documentation.)


If all goes well you should get a render that looks something like this.


Turn on do Multiple scattering under Multiple Scattering. leave settings as is. Add a single directional light.


These are both rendered at .3 spacing and took 55 seconds on a 40 core dual xeon @ 960x540

45 seconds

1.5 minutes


Hope you enjoyed this tutorial. If it helps you drop me a line in the comments please!


Friday, August 7, 2015

Change the length of key tangents in the graph editor in Maya

For some reason Maya by default tangents in the graph editor are locked up tighter than a beer cap without a bottle opener unless you do these steps.


1. Open the graph editor

2. Select all your keys in the graph editor (or juts the ones you want to effect)

3. Go to curves menu in the graph editor and choose "weighted tangents"

4. Then with all of them still selected goto tangents menu and choose "free tangents"

Now they should unlock and give you ALOT mroe flexibility in your graph editor.

Tuesday, May 12, 2015

Using Backburner with Maya Render Layers

So if you have found your way here chances are you are trying to accomplish this illusive phenomena known as getting render layers to work in Back Burner with maya. If you just start a scene rendering with "send to backburner" in maya you will ONLY get the masterLayer

I spent a lot of time researching this and found a script someone wrote to submit multiple jobs, one per render layer to Backburner. IT IS PURE GENIUS.

I'm posting the script here because it is so amazing I don't want to see it disappearing from the web. But I will link to the great guy that created it as well and if you are the guy who created it and want me to take it down from here i'm glad too.

Here is his blog.
http://www.marianoantico.blogspot.com/

Here is the Python script

Creative crash link if you'd prefer to get it there.
http://www.creativecrash.com/maya/script/to-backburner

Just create a new shelf icon in maya and paste the code from this script into the command section for the shelf icon. No need to "install" it anywhere.

The only thing you will need to tweak is to open the script in notepad change and update the maya path on line 251 and 602 to reflect your version of maya. Search for 2011 and replace it with your version in my case 2015.

If you don't do this BB will throw a create Cmdjob Process error: 2 and not give you any other information as to why it isn't working. But it's this path that is the problem.

Otherwise the script is pretty self explanitory, it sends a BB job for each render layer and your good to go!

See his mini tutorial here.
https://vimeo.com/35570376

Thanks Mariano!!

ADDITIONAL TIP
You can also change the path your files are going to render to by adding this command to the "additional options" field on this script to each job before submitting.

If you don't ALL images even from different render layers will go into the same folder. Example.

-rd "//VFX_NAS/Maya_Project/images/Shot_1"

ANOTHER TIP
You can install backburner Monitor on multiple machines to be able to watch the jobs. but only one of them can control the jobs, add render nodes etc. To change which system controls the render que simple open Monitor on the system you want to control it from. Connect to the manager IP and hit ctrl-Q


Wednesday, October 22, 2014

Change default save from binary to ASCII (maya)

Simple tip but if you can't find where to change this can be frustrating.

Just go to file menu in the top of maya. Then click the little square next to "save scene as" Now in the popup you can select maya ASCII as the default save type.

Friday, August 29, 2014

Slow motion rain drops in Maya (vray maya material)


1. First create a polygon sphere


This will function as our rain drop and we will use it in the nparticle instancer. First thing we will do is setup an animationed "warble" on the droplet so that it isn't just a static sphere.

2. Now in the animation sub set menu goto create deformers>lattice

A lattice appears around our rain drop,


In your attributes on the right you can change it's resolution


3. Set it to 3 x 3 x 3


4. Right click the lattice and go to lattice point and taper the top a bit to make it a little more tear drop shaped.

Tuesday, July 23, 2013

Ptex displacement and texturing in Mudbox to V-ray for Maya PART 1


  • CREATING YOUR BASE MESH
First create your basemesh in Maya or your tool of choice. Ptex is not a silver bullet so here are some things to remember when creating your base mesh.
  • Be very careful how high you take your ptex texel resolution. You can basically bring your computer to it's knees.
  • Ptex will work best with EVENLY SPACED Topology. Otherwise parts of your model will be high res and other parts will be pixelated.
  • Try to use quads whenever possible, tris and n-gons may introduce problems.
  • Clean your model up. Polygons menu set>Mesh>cleanup in maya. Try not to have any errors when you import into Mudbox.
  • Correct SCALE. Export your OBJ base mesh from Maya at the same scale as a default Mudbox model. DO NOT scale your mesh up or down. Export it from Maya at the correct size initially.

Keeping these in mind. Let's continue!

1. Export your mesh as an OBJ from Maya or your tool of choice. Here is my mesh. It's more detailed then it needs to be but it will serve to show this process just fine.


  • WORKING WITH THE MODEL IN MUDBOX
2. Goto file>import and select your OBJ. Mine only gives an “incomplete UV set” message” because I didn't create any UV”s for the model. This isn't a problem continue on.


3.Select your mesh in mudbox. Then go to UV & Maps>PTEX Setup. Your model will get covered with diamonds showing the resolution of the ptex. 


4. Increase or decrease the resolution until the diamonds are sharp at the distance you will be seeing it in the final render. In my case i'm going with 16m texels (roughly 4k texture resolution. Press “done”.

  • Ptex Tips

If you want to increase the resolution of just a part of your Ptex file (like add a larger Ptex
to just the forehead of a face)... Go to Windows -> Preferences -> Render -> Render Selected By Face.

If you ever need to upres or downres your Ptex painting later, just go back into UV & Maps>PTEX
Setup, it will remember your current setting, and let you modify the resolution. Remember, the
more resolution, the larger your Ptex file and the more RAM it takes up.

5. Now that we have ptex setup let's start sculpting. Press shift  'D' to increase the desired subdivision level from zero. I'm taking mine to up to level 5.

6. Sculpt and paint your model. Lots of tutorials about that process online so I won't go into that at all. Once complete move on to the next step.

  • EXPORT YOUR DISPLACEMENT FOR MAYA (Mudbox 2014)
7. Go to UV's & Maps> Extract texture maps> New Operation' from the menu bar.


8. In the pop up select to export a 'Displacement Map'.
9.In the Target Models box: select your mesh at the lowest desired subdivision level for your basemesh - usually level 0. but sometimes level1 if you need a little more detail in the base mesh.

10. Set 'Smooth Target Models' to CHECKED.
11. Set 'Smooth Target UVs' to UNCHECKED.
12. Set 'Use Creases & Hard Edges' to CHECKED.

13. In the Source Models box: select your mesh at the highest subdivision level in my case level 5

14. Set 'Smooth Source Models' to CHECKED.
15. Set Method to 'Subdivision'
16. Change the Texel Distribution dropdown to 'use PTEX Setup' if you don't your displaceament will be small and pixelated.


17. Click the 'Base Filename' options box (...), choose a filename and directory to save your Ptex file too preferably with DISPLACE in the title.
18. Make sure Data format says '32 bit float'

Here is a pic of all settings.

19. Click the 'Extract' button to run the displacement map generation.
Your displacement map is now ready for use!


  • EXPORTING TEXTURE MAPS FROM MUDBOX
20. Select the layer your painted in the layers palette in Mudbox (see pic) Right click on the layer and select 'export selected'


21. Choose a name and location for your file. You can also choose Ptex 16 bit to keep the file size down if you wish. Save the file as DIFFUSE.


  • EXPORTING THE LOW RES MESH FROM MUDBOX
Press 'page down” key on the keyboard until you reach subdivision level 0

Select your mesh in mudbox and go to file>export selection. Choose a location to save your low resolution OBJ.


Now we should be done in Mudbox it's time to move to Maya and get it the displacement working! It's time to move on to PART 2. Stay tuned for that in the next couple of days!!


Monday, July 22, 2013

Ptex displacement and texturing in Mudbox to V-ray for Maya PART 2


This tutorial presumes you have already completed Part 1 and are ready to import your Mudbox model to Maya and Render it in V-ray.
  • SETTING UP PTEX DISPLACEMENT IN MAYA
  1. Open Maya and import the level 0 OBJ you exported from mudbox. Don't try and use the original base mesh that you imported into mudbox.(pic)

  2. Select your mesh, open the attribute editor, and have your object's Shape node tab selected. Then in the attribute editor's menu click 'Attributes -> V-Ray' and check 'Subdivision', 'Subdivision and Displacement Quality' and 'Displacement Control' to add those extra attributes to your mesh's Shape node.

  3. Scroll to the bottom of the attribute editor and expand the 'Extra V-Ray Attributes' rollout.
  4. Set 'Render As A Subdivision Surface' to CHECKED.
  5. Set 'Subdivide UVs' to UNCHECKED.
  6. Set 'Edge Length' to a value of 4.0 to begin with, and lower as needed for better displacement quality (At the expense of higher render times).
  7. Select 'Normal Displacement' from the Displacement Type dropdown.
  8. Set 'Keep Continuity' to CHECKED.
  9. Leave all other settings at their defaults. Here is a screen shot of the above settings to verify


  10. Right click on your model, create a VRayMtl for it with the menus 'Assign New Material' Select a vraymtl and assign it to your mesh. 


  11. With you model selected, open your hypershade, in the hypershade go to the menu graph> graph materials on selected objects. This will show the nodes for your vraymtl material.


  12. Type 'dis' in the hypershade search box. And click 'Displacement' to add a 'Displacement' node to the work area from maya's list of hypershade nodes on the left, then middle-click-drag from the Displacement node to the VRayMtlSG node and then select 'Default'.


  13. Now type 'ptex' in the hypershade search box. Add a 'Vray Ptex' node middle-click-drag from the v-ray ptex node node to the Displacement node and then select 'Other...'


  14. The connection editor pops up. On the left side of the connection editor, click the plus next to 'OutColor' to expand it and select 'OutColorR', then select the 'Displacement' value on the right side to connect them. Close the connection editor.


  15. Now select the 'VrayPtex1' node in hypergraph, open the attribute editor, and click the file icon next to 'ptex file name' and load the Ptex displacement map file you exported from mudbox during part 1 of the tutorial.


  16. Let's do a test render. Our Ptex Displacement map should be working but some of the indentations are 'filled in' let's fix that or not quite accurate.


  17. Select your mesh and open the attribute editor. Select the 'Shape' node and open up the 'extra Vray Attributes' dropdown. Down at the bottom of that you will see a black and white color swatch . Click the 'Displacement Bounds' drop down menu and select “Explicit”


  18. Click on the black color swatch below that next to 'MIN value'. A color picker comes up put '-1' in the 'V' attribute.


  19. Do another test render. Now it should be working properly!


  • ADD YOUR PTEX TEXTURE
I'm going to add a quick v-ray dome light, and a directional light with shadows so we can see our model better. I'm also turning on GI rendering because this is what I will be using in my final render.


  1. In your hypershade select your VrayMtl1 material, and pull up your attribute editor for it on the right side of maya.

  2. Now in the hypershade type ptex in the search box and create a new Ptex node, select it in the hypershade. In the atribute editor Click the file icon next to 'Ptex File Name' and locate your Ptex texture we exported from Mudbox during part 1.


  3. Now select your VrayMtl in the hypershade to bring up it's attributes.
  4. Middle mouse button click and drag the VrayPtex2 node onto the Diffuse Color slot in your vraymtl material.


  5. Open the Maya Render Settings window, go to the 'V-Ray' tab, and open the 'Global Options' rollout. Make sure that the checkbox next to 'Displacement' is checked.

  6. Render again and the texture should be applied. If you need to add any more maps bump, specular etc. Just create a new ptex node in the and middle mouse drag it into the appropriate slot of your material.


That's it! You can now use Ptex files you have painted in Mudbox in V-ray for Maya! The cool thing is it's not hard to bring your PTEX back to a UV workflow. But that is a topic of another tutorial. :) Comment below if you are interested in a tutorial on that!

Please check "HELPFUL" below if it was, if not COMMENT below and tell me why! Don't miss another tutorial or tip! Subscribe to Maya Zest