- CREATING YOUR BASE MESH
First create your basemesh in Maya or
your tool of choice. Ptex is not a silver bullet so here are some things to remember when creating your base mesh.
- Be very careful how high you take your ptex texel resolution. You can basically bring your computer to it's knees.
- Ptex will work best with EVENLY SPACED Topology. Otherwise parts of your model will be high res and other parts will be pixelated.
- Try to use quads whenever possible, tris and n-gons may introduce problems.
- Clean your model up. Polygons menu set>Mesh>cleanup in maya. Try not to have any errors when you import into Mudbox.
- Correct SCALE. Export your OBJ base mesh from Maya at the same scale as a default Mudbox model. DO NOT scale your mesh up or down. Export it from Maya at the correct size initially.
Keeping these in mind. Let's continue!
1. Export your mesh as an OBJ from Maya
or your tool of choice. Here is my mesh. It's more detailed then it
needs to be but it will serve to show this process just fine.
- WORKING WITH THE MODEL IN MUDBOX
2. Goto file>import and select your
OBJ. Mine only gives an “incomplete UV set” message” because I
didn't create any UV”s for the model. This isn't a problem continue
on.
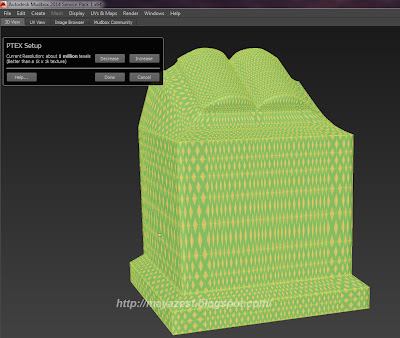
3.Select your mesh in mudbox. Then go to
UV & Maps>PTEX Setup. Your model will get covered with
diamonds showing the resolution of the ptex.
4. Increase or decrease
the resolution until the diamonds are sharp at the distance you will
be seeing it in the final render. In my case i'm going with 16m
texels (roughly 4k texture resolution. Press “done”.
- Ptex Tips
If you want to increase the resolution
of just a part of your Ptex file (like add a larger Ptex
to just the forehead of a face)... Go to Windows -> Preferences ->
Render -> Render Selected By Face.
If you ever need to upres or downres
your Ptex painting later, just go back into UV & Maps>PTEX
Setup, it will remember your current
setting, and let you modify the resolution. Remember, the
more resolution, the larger your Ptex
file and the more RAM it takes up.
5. Now that we have ptex setup let's start sculpting. Press shift 'D' to increase the
desired subdivision level from zero. I'm taking mine to up to level 5.
6. Sculpt and paint your model. Lots of
tutorials about that process online so I won't go into that at all.
Once complete move on to the next step.
- EXPORT YOUR DISPLACEMENT FOR MAYA (Mudbox 2014)
8. In the pop up select to export a
'Displacement Map'.
9.In the Target Models box: select
your mesh at the lowest desired subdivision level for your basemesh -
usually level 0. but sometimes level1 if you need a little more
detail in the base mesh.
10. Set 'Smooth Target Models' to CHECKED.
11. Set 'Smooth Target UVs' to UNCHECKED.
12. Set 'Use Creases & Hard Edges' to
CHECKED.
13. In the Source Models box: select your
mesh at the highest subdivision level in my case level 5
14. Set 'Smooth Source Models' to CHECKED.
15. Set Method to 'Subdivision'
16. Change the Texel Distribution dropdown
to 'use PTEX Setup' if you don't your displaceament will be small and
pixelated.
17. Click the 'Base Filename' options box
(...), choose a filename and directory to save your Ptex file too
preferably with DISPLACE in the title.
18. Make sure Data format says '32 bit
float'
Here is a pic of all settings.
19. Click the 'Extract' button to run the
displacement map generation.
Your displacement map is now ready for
use!
- EXPORTING TEXTURE MAPS FROM MUDBOX
20. Select the layer your painted in the
layers palette in Mudbox (see pic) Right click on the layer and
select 'export selected'
21. Choose a name and location for your
file. You can also choose Ptex 16 bit to keep the file size down if
you wish. Save the file as DIFFUSE.
- EXPORTING THE LOW RES MESH FROM MUDBOX
Press 'page down” key on the keyboard
until you reach subdivision level 0
Select your mesh in mudbox and go to
file>export selection. Choose a location to save your low
resolution OBJ.
Now we should be done in Mudbox it's time to move to Maya and get it the displacement working! It's time to move on to PART 2. Stay tuned for that in the next couple of days!!


