Search Maya Zest


Friday, December 30, 2011

Vray Benchmark Intel i7 3930k vs AMD 1090T

I just upgraded to a new system and I wanted to show the difference in speeds in case you were interested.

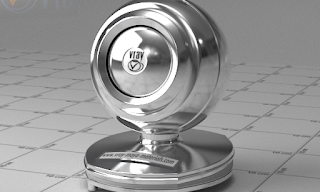
The file used is a material render scene from http://vray-maya-materials.com Then the Kitchen Metal Silver material from the same website has been applied to it.


The scene is not RAM heavy so I believe both systems have an adequate amount of RAM for a test, neither system approached it's maximum during rendering.

Render Results:
AMD 1090T 6 core 8GB RAM
8:28 minutes

Intel i7 3930k 6 core 32GB RAM
3:37 minutes

This is over 130% faster. I haven't even tried overclocking this system yet but this looks very promising!

These speeds also correspond nicely with the benchmarks on http://www.cpubenchmark.net/high_end_cpus.html

Intel 3930k benched @ 14,565
AMD Phenom 1090T @ 6,059

UPDATED!
Gigaflops as measured by PC wizard 2010 are:
Intel 3930k benched @ 190 gigaflops
AMD Phenom 1090T @ 119 gigaflops


You can use these numbers to perhaps get an idea of what a chip upgrade might do for you.

If you are thinking of upgrading I can highly recommend it! Feel free to post your own benchmark of the same scene in the comments below.

Please check "HELPFUL" below if it was, if not COMMENT below and tell me why! Don't miss another tutorial or tip! Subscribe to Maya Zest


Thursday, December 15, 2011

Maya rendering down sampling quality difference at 3k to 1080p.

In the ever proceeding quest for quality I ran some resolution tests and thought I would post the results. The next film we are shooting on Red One MX at 4k but will master at 1080p. I'm currently planning a 3k VFX workflow for a number of reasons, but as you will see from the these test renders the quality difference is definitive.

Click the picture to see the high res difference between the images shown at 100% scaling. If you right click and save you can be sure to see the image at full size. I think the blog will scale it down some if you don't.


The right most image is a 1080p render straight out of Maya. This is rendered at the "production quality" render setting in Mental Ray. So it's not just an antialising issue. The quality just isn't as good.

Rendering at 3k and down sampling to 1080p appears to me to offer the biggest bang for the buck as to quality to render time ratio.

If I have time I will do some over sampling/ render time ratio tests to see if it's better to turn up sampling or just render larger images.

Tell me your thoughts! What do you think of pros and cons to a 3k VFX workflow?

Please check "HELPFUL" below if it was, if not COMMENT below and tell me why! Don't miss another tutorial or tip! Subscribe to Maya Zest 

Wednesday, December 14, 2011

Where is the measure tool in Maya?

Just in case you can't find it.

Top Maya menu "Create>Measure Tool>Distance tool.

It will create two nulls in your scene when you click twice. If you select a null and hold V when dragging it will snap to the vertex of your object. Allowing you to precisely measure between two point.

Please check "HELPFUL" below if it was, if not COMMENT below and tell me why! Don't miss another tutorial or tip! Subscribe to Maya Zest 


Wednesday, December 7, 2011

V-Ray for Maya and Mudbox Displacement Tutorial


How to get your Mudbox model displacements into Maya and V-Ray 2.0? Technically this should be quite simple, but if you're using a 32-bit EXR, it's a bit harder. Here's how to get it working!

Wednesday, November 30, 2011

How to convert Autodesk Max V-ray To Maya V-ray materials?


NOTE: Several people have commented that this doesn't work for them anymore. I don't have access to Max any longer so I can't test it unfortunately. If it does work for you please comment below so that others can find out what worked for you.

If you find yourself cursing Mental Ray's integration to Maya then you OWE it to yourself to try V-ray for Maya. It's a whole different ball game of ease and happiness instead of horror and retribution! However you will notice that there are TONS of V-ray materials available for Max but not so many for Maya. Terribly unfair by my estimation, here is the solution!

Tuesday, November 29, 2011

Turn on Object information HUD Maya


Just in case you can't find out where to do this.

Wednesday, November 16, 2011

More Realistic Cumulus Clouds using Maya fluids


Yes, I went over the top with this image. Sooner or later however you are going to want to create those beautiful fluffy Cumulus clouds in Maya. You will no doubt find several tutorials online showing you how to do this. They show you how to use fluids to create a cloud but not how to make them look NICE.

The top image took 42 minutes to render at 720p on a AMD 6 core 1090T chip. Not amazing but pretty decent for that kind of cloud detail. What good is a beautiful cloudscape if it takes a year to render?

Saturday, November 12, 2011

Upgraded commenting engine

I don't know about you guys but the Blogger commenting engine really annoys me. The main problem being that new comments are at the bottom instead of at the top. Practically useless.  So I've upgraded to Disqus http://disqus.com and I'm hoping that will prove to be a much better method. I can highly recommend it.

Saturday, October 29, 2011

Viewports blank in Maya 2010 but objects still render

This seems to happen related to using Vue Xstream with Maya but other things may cause it as well. occasionally due to graphics drivers or something when you open Maya all viewports are just blank. You can create a new object and it will render fine but the viewports still display entirely empty.

A solution appears to be to open an old scene, everything should display correctly. Then close Maya. Reopen and now you should be able to see your grid etc. Very strange little issue which seems easy enough to fix but it actually took a little tinkering to fix.

Please check "HELPFUL" below if it was, if not COMMENT below and tell me why! Don't miss another tutorial or tip! Subscribe to Maya Zest  

Monday, October 10, 2011

Fixing washed out textures and image when using Physical Sun and Sky (Maya)


File textures may get washed out, because of incorrect gamma. The mia_exposure_control applies gamma correction on the final image. Mental Ray expects file textures to be 'gamma neutral', which they are (probably) not. Chances are you've created them for a gamma of 2.2 or so, which is the default for computer screens. If the mia_exposure control corrects the final rendered image to the gamma you specified, the textures would get gamma-corrected again, which causes them to look washed out:
MR gamma correction off.jpg
MR gamma correction on.jpg
The left side shows a render without proper gamma correction, the right side shows the render as it is supposed to be, after proper gamma correction of the file textures.
There are two main methods to solve this problem: Change the Mental Ray internal framebuffer gamma and the Exposure control gamma, or gamma-correct each filetexture.
The first method is the easiest to implement:
  • Open you Render settings, Mental Ray tab. Find the Framebuffer section and open the Primary Framebuffer subsection. Set the gamma to 1/desired gamma, so 1/2.2 = 0.4545 for a end-result gamma of 2.2
  • Set the Gamma of your mia_exposure_simple to 1.00.
Alternatively you could use the MR Gamma correction MEL script to correct the gamma. This will add gamma correction nodes to all file textures, counter-correcting them for the specified gamma, so the end result should look good.

Please check "HELPFUL" below if it was, if not COMMENT below and tell me why! Don't miss another tutorial or tip! Subscribe to Maya Zest  

Saturday, September 17, 2011

Detailed Brushed Metal Anisotropic Shader tutorial (maya)


First off Anisotropic shaders are bit tricky, how good they look has a LOT to do with the environment and lighting. You can have the greatest shader in the world but unless those other two factors are also perfect you WON'T SEE IT.

ANISOTROPIC SHADER RECIPE


Friday, September 16, 2011

Model moves to wrong position when exporting POD PVRGeoPOD MAYA

When you try to export to a POD file using PVRGeoPOD if you hit export and the model get's all jumbled up it is because the transformation center isn't the same for all parts of the object.

First select all objects delete your history

Select object in your viewport. Edit Menu>delete by type> History

Then freeze transformations on all selected objects

Modify menu>freeze transformations.

If you get an error message like this:  "Freeze Transform was not applied because subdivCylinder1.translateX has incoming connection"

Here is the blog post describing how to fix that error message

Can't freeze transformations message (translateX has incoming connection) Maya

You might run into something like this message when trying to Freeze transform: 

Freeze Transform was not applied because subdivCylinder1.translateX has incoming connection

First thing you should do is try deleting history on the the object.Select object in your viewport. Edit Menu>delete by type> History
If that doesn't work try something else. 

Select your model then open the channel box/layer editor (far right most of the three little icons in the top right of your screen) 

In the channel editor you will see al your channels Translate X, Y Z, Rotate X,Y,Z etc. If they are all highlighted with like a pink or orange color then they have connections to them. 

Click the top on then hold shift and click the bottom one "Scale Z" to select them all. Now right click on them a menu pops up select "break connections" The highlight color should disappear. 

Now go and delete your history for the object again. 

Select object in your viewport. Edit Menu>delete by type> History

NOW try a freeze transform and it should work!


This additional note from Tyler Wood on what might be causing this issue. 
Hi guys, so I just ran into this problem, but I know exactly what the issue is. You run into this issue when you key an object and then try to freeze the transformations. For me, sometimes I key an object and move it out of the way when modeling so I can snap it right back to where i want it by scrubbing the timeline. You just have to remember to delete the keys when you're done. It can be confusing if, like me you started parenting objects and getting everything ready for rigging. The parent may have the keys deleted but all of the children need to have keys removed as well before you can freeze it in place. Hope that clears up everything for everybody! -Tyler Wood

Monday, September 12, 2011

Creating a realistic brick shader with randomly shuffled tiles in Maya. Tutorial


1. Creating a realistic brick shader with randomly shuffled tiles in Maya.

This technique may look a little complex but you will find it is very useful! You could use it to create mixes of tiles for floors space ship hulls all kinds of things.

Tuesday, September 6, 2011

How to create 3D models for I-phone and Andriod with Maya.


There doesn't seem to be a lot of information readily available yet for how to do this but here is the link to download the development tools. Basically it's a plugin-for maya that let's you export POD files. These can then be textured and displayed in code using openGL on the iphone etc.

Please note the SDK is ONLY for Maya 32 bit! It crashes Maya 64bit.

Here is the workflow>>>

Saturday, September 3, 2011

Fixing Faces with zero map area Problem in Maya

I've run into an interesting issue when creating models for I-phone 3D display. The model works fine in PVRshamman but once in code crashes. Once solution proposed online is to do a "cleanup" operation in Maya. Upon trying to do this however I notice that shapes with "zero map area" are disappearing from my model on cleanup. It seems to happen if the object doesn't have full UV co-ordinates assigned. Therefore here is the solution.

Select your object, then with the Polygons main sub menu selected in the left. Go to Create UV's>automatic mapping.

This will give the entire object some form of UV mapping. Then upon cleaning up Faces With Zero Map area you won't lose geometry. Hope that helps someone out!

Saturday, August 13, 2011

Create and animate growing tube, rope, plant (MAYA)


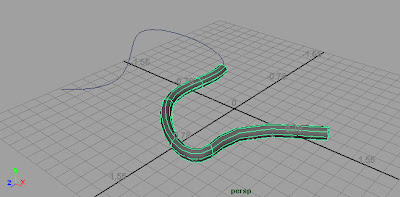
There are a number of tutorials on the web for animating a growing vine, tube or rope along a path. I noticed however that steps are sometimes left out which might make it difficult for some to accomplish the effect. Here this is the process I went through to make it work.

Saturday, July 16, 2011

Animatable Boolean Operations in MAYA


Booleans in Maya or just about any 3D application leave MUCH to be desired... usually you find yourself just pulling your hair out trying to get something to work unless they are very simple objects. However, never fear for a solution is available for Maya to make booleans actually WORK.

It's a little gem of a MEL script called fRayBooleanMaster click the name to download.

It is very straight forward to use. First, place the MEL file in your Maya scripts directory. Then in the Maya MEL script box at the bottom of the screen type "fRayBooleanMaster" no quotes. Capitalization has to MATCH the name of the MEL script file.

If the script file is in the correct folder immediately the little BooleanMaster script window will pop up. Select your first object, and then click "load intruder" then select your second object and select " load victim" Then you can either press "Finalize Boolean" to make the cut or "Keep animatable" if you want the objects to stay movable and animatable during the operation.

It creates a hierarchy in your outliner where you can move the effector and victim objects independently and even keyframe their movement if you like.

This powerful script was graciously created and provided freely by http://www.creativecrash.com/users/escopos

Enjoy your new found ability to Boolean!

Tuesday, May 17, 2011

Fixing Blurry Textures or Text in Maya Mental Ray using filtering


Recently, I hit this issue where the textures are blurry in the render ONLY when using Mental Ray. This is because MR does some serious sampling to soften the image.

Monday, May 2, 2011

Reset or restore tool bar in maya to default

If you inadvertently close your icon toolbars in Maya this is the way to reset them again.

Go to Window > Settings/Preferences > Preferences
Edit > Restore to Default.

If should not wipe any custom shelves you have created


Alternatively if your MAIN MENU bar at the top is gone you can press ctrl + m. should unhide it.

Friday, April 29, 2011

File formats for multi pass rendering compared


There are many formats that can be used for creating multi-pass renderings from 3ds max, Maya, etc. Here are some of the pros and cons of these formats laid out in comparison.

Thursday, April 28, 2011

Export After Effects CS3 camera paths to Maya, Max, Lightwave

Run this little script in After effects CS3 to export your AE camera path to Autodesk Maya, Lightwave or Max. I have only used it in Maya so far, but it works fantastic! Unfortunately though, I could NOT get the script to run in After Effects CS5, it crashes.

This script was graciously created by Ryan Gilmore (www.urbanspaceman.net)

In AE just go to file>scripts>run script file.

Here's the link.

Monday, April 25, 2011

Casting shadows from Physical Sun on a Use Background surface


Casting shadows from Physical Sun on a surface that has a Use Background shader

Issue:
When you apply a Use Background shader to a surface, the Physical Sun does not cast shadows on the surface.

Solution:
To cast the shadows, please do the following:

1. First in render settings go to the indirect lighting tab, then select "create" next to physical sun and sky. This will create the physical sun lighting setup, which will look great but it won't cast any shadows on any use background shader objects.


2. Assign the Use Background shader to your surfaces.

3. In the Attribute Editor for the Use Background shader, turn off reflection.
Create a new Directional Light. You won't get the shadows with the default sky sun light. Put the new Directional Light above the original sun light and match the rotation of the original sun light.
In the Attribute Editor for the new Directional Light, set the intensity to .3 and turn on ray traced shadows.

4. Duplicate the new Directional Light, set its intensity to -.3, and turn off ray trace shadows.
The two directional lights cancel each other out, so that the default sun light controls the amount of light in the scene

5. Now select your camera in the outliner. In your viewport>Panels>panel>outliner.

6. In the attribute editor (accessible on the top right of the screen. three tiny icons it is the left most) Once your camera is selected you will see several tabs in the atribute editor on the right. choose mia_physical sky. Down near the bottom is a "use background, checkbox, clikc this box then hit the checkorboard button to the right. This will allow you to pick a material to use for the background. Select "surface shader" from the list of standar maya shaders.

7. Select a TGA for your Render and you are done! You have a alpha channel that captures the shadow being cast on the use background shader!

Please hit "helpful" below if it was!


Friday, April 22, 2011

enabling production shaders (MAYA)


Enabling Mentalray Production Shaders

Maya hides the Mentalray production shaders (mip shaders) by default. To enable the mip shaders as of Maya 2009 run the following MEL code by typing it in the script box at the bottom of Maya and pressing enter.
optionVar -iv "MIP_SHD_EXPOSE" 1;

Please check "HELPFUL" below if it was, if not COMMENT below and tell me why! Don't miss another tutorial or tip! Subscribe to Maya Zest 

2D layer tracking to 3D layer position (After Effects)

I needed a way to attached a 2d layer in after effects to a 3d layer which was moving in 3d space. Searching online led me to this brilliant little snippet of code which connect the two. Simply alt click the clock next to the position attribute of the 2D layer you want to follow the 3D layer. Then change the "my3DLayer" (only change what's between the quotes) to the name of the 3D layer you wish to match the movement of.

l = thisComp.layer("My3DLayer"); l.toComp(l.anchorPoint);
It works great! Please let me know if you found this useful!

Tuesday, April 19, 2011

Unwanted moving or animated UV MAP (MAYA)

Recently I had to do some UV map finagling and somehow managed to get my model into a state where if I moved the rig, one of the UV maps would literally slide around in the UV editor, causing the map to go crazy on that part of the model.

The solution!? Delete NON deformer history for the model.

edit>delete by type>non-deformer history

Check to make sure everything still works correctly and you are good to go!

Please check "HELPFUL" below if it was, if not COMMENT below and tell me why! Don't miss another tutorial or tip! Subscribe to Maya Zest  

Tuesday, April 5, 2011

How to find your MEL scripts path MAYA

Sometimes it's a pain to try and assertain where in the blazes your Maya MEL scripts folder actually is. Here is a quick way to locate it!

type "internalVar -usd;" no quotes into the MEL script box in the bottom left of Maya and hit enter.

Then pull up the script editor in the bottom right of Maya to view the path.


SPECIAL NOTE:
Apparently when you install MayaBonus2010 Tools your scripts path might get changed and even if you run the command above it will not tell you the correct location of your scripts folder. If you press the scripts box, very lower right of the screen in Maya. You can then select file>load script, and this should show you the new folder.
In my case E:/MayaBonusTools2010/scripts

That was a royal pain to figure out. It coudln't seem to locate my scripts folder anywhere...

If you come across any easy way to locate your Maya scripts folder please let me know!

Monday, March 14, 2011

How to add a joint to an existing MAYA RIG


First create your joint name it something appropriate so you can find it in the list of other joints.

Select the joint hold shift and select your mesh.

Go to skin>edit smooth skin>add influence SETUP

Now turn the default weighting to "0" at the bottom. Then turn "weight locking on".This will attach your joint to the new mesh without messing with you current weighting.

Now select your mesh and go to:

skin>edit smooth skin>Paint Skin weights tool

Find your joint in the list of bones that appear in the paint skin weights settings. Below the list is a "toggle Hold Weights on selected" button. Press this to remove the hold on the new joint you created.

And you're done!

Please check "HELPFUL" below if it was, if not COMMENT below and tell me why! Don't miss another tutorial or tip! Subscribe to Maya Zest  

Monday, January 31, 2011

Display Vertex Normals in Maya

An easy way to see the normals is to go into Lightning in the main window and un-check 'two sided lightning'.. this way all the faces with wrong normals will display black. I usually set it up right away when i start new project, the green lines are just way to confusing..

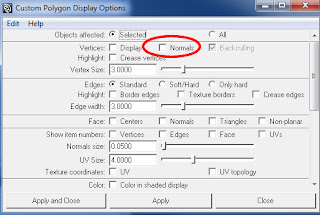
However if you wish you can also set the program to display vertex normals in maya you first access it by selecting the "display" menu up in the top

Then select Polygons>Custom Polygon Display. This will bring up the option box. Check normals and then apply. That's it!


Please check "HELPFUL" below if it was, if not COMMENT below and tell me why! Don't miss another tutorial or tip! Subscribe to Maya Zest  

Friday, January 28, 2011

Creating a nice brushed metal (anisotropic) shader with Mental Ray tutorial


ANISOTROPIC SHADER RECIPE

Here is a mix for creating an Anisotropic shader in Maya and Mental Ray. How good metal looks is very dependant on your lighting so keep that in mind.

CLICK HERE FOR THE DETAILED VERSION OF THIS TUTORIAL

Create a new Anisotropic Maya node and apply it to your object.

Now create a quick area light to hit up our object with. Menus: Create>Lights>Area Light. Position the light above your object.

I'm also just going to put a simple wood texture on the floor just to give us more
reflections to play with in the scene. Do a render to see what you are getting.

In your hypershade select your anisotrpic1 node. In the Attribute Editor under the drop
down Specular Shading DISABLE the Anisotrpic Reflectivity Checkbox. This will let you
control the level of reflectivity yourself.

Then make these settings to the anisotrpic

Reflectivity 0.736

Diffuse setting to 0.132

Spread X to 7.532 and Spread Y to 5.882

Roughness to .7

Fresnel Index to 2.0

Go to render options menu: Window>Rendering Editors>Render Settings. Then to the
Indirect Lighting Tab at the top of this you will see Image Based Lighting. Click the
CREATE button next to it. Immediately an IBL node system will be set up in your scene,
though it may look like nothing happened.

In the attribute editor it should open your IBL atributes. click the small folder to
load an HDR file. These can be downloaded from many free sites online.


Now we have nice anisotropic highlights but perfectly crisp reflections.

In the hypershade create a 2D as projection NOISE node. Make the following settings

Threshold 0.1
Amplitude 0.140
Ratio 1.0
Requency Ratio 1.744

Next in hypershade select the place2Dtexture node attached to your noise1 node. In the
attribute editor increase the "RepeatUV" fields to these values. U is first V second.

U 0.05
V 100

Basically, this just makes streaks. Now attach it to your Anisotropic shader's
reflections. First in the hypershade select the anisotropic_noise1 node. In your
attribute editor expand the Mental Ray drop down. You will see a Mi Reflection blur
attribute.

Now in your hypershade MIDDLE house click and hold down on the projection1 node. Drag it
over to the attribute editor and connect it to the Mi Reflection blur attribute.

The connection editor will appears. Connect OUTALPHA on the left to miReflectionBlur on
the right

Now let's render and see what we are getting.


To smooth grain of the reflection select your anisotropic1 node in the hypershade then
in the Attribute Editor expand the Mental Ray drop down and set the Reflection Rays
setting to 50.  


In your Hypershade under Create Maya Nodes, scroll down to the 3D textures drop down
and create a new Cloud node.

Connect the cloud node to the color aatribute on your anisotrpic node.

That's it you should have a very good starting place for anisotropic metals with this
shader.


If you want to pick up the exact shader that I am using in my Espresso scene at the top you can Subscribe to Maya Zest and I'll email it to you as a thank you.


Monday, January 24, 2011

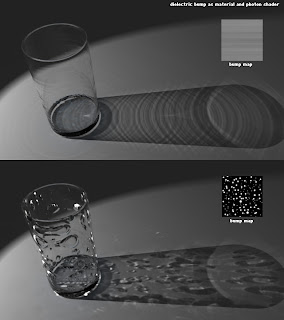
Bump mapping a mia_material (wine glass)


First open the hypershade editor and select "create mental ray nodes" and create a new mia_material.

It the attribute editor on the right. Click and hold the "presets" button and select "glass thick>replace

Open the hypershade under create maya nodes>General Utilities>Bump 2d

This to creates a new 2d bump node.

Select the new 2d bump node then click the checker-box in 2d bump attributes next to "Bump depth"

Select "file" from the create node dialog box, two 2d place texture nodes a stencil and a file node will appear. connected to the bump node.

Delete the stencil node, and the place node farthest away from the file node.

Select your file node and click the folder next to image name and choose the normal map you would like to use.

Now middle mouse button click and drag from your file normal map picture node to the bump 2d node.

in hypershade go to create mental ray node>materials>misss_set_normal (icon is black background with yellow arrows bouncing from a bluish lens.

Now middle click and drag from your 2d bump node to your misss_set_normal node. On releasing a menu will pop up select to connect "normal"

Now finally we can connect it to the mia_material node. middle click and drag from your misss_set_normal node to your mia_material node. Select "other" at the bottom of the pop up list.

In the connection editor that pops up select "outvalue" on the left side. scroll down and select bump on the right column. Press close at the bottom.

Lastly select your bump map node and in the attribute editor click the "use as" dropdown. Select Tangent Space normals. Because this is normal map not a bump map.


Congratulations you just created a bump map on your mia_material.


Please check "HELPFUL" below if it was, if not COMMENT below and tell me why! Don't miss another tutorial or tip! Subscribe to Maya Zest  

Thursday, January 20, 2011

Tutorial - Maya's Paint Geometry Tool


Maya's Paint Geometry Tool from Alex Villabon on Vimeo.

Please check "HELPFUL" below if it was, if not COMMENT below and tell me why! Don't miss another tutorial or tip! Subscribe to Maya Zest 

How to turn "Primary Visibility" off many grouped objects

To turn off "Primary Visiblity" on all objects quickly, use the Attribute Spreadsheet (Windows -> General Editors -> Attribute Spreadsheet) Select all your objects any way you choose (via the entire group or individually) select the top field "Primary visibility" field where it says "on" select the top one, hold shift and select the bottom one. Then type "off" in the top and press enter. The status of all sub objects will be set.


updated for creating layer overrides.


To do this as an OVERRIDE you have to do a specific action to make it work. With the attribute spread sheet pulled up. 

1. First select your objects in the outliner.

2.Click in the VISIBILITY box (where is says yes or no)
3. now shift click down in the visibility box of your last object. They should be tagged in blue. THIS WILL NOT WORK IF YOU JUST TRY TO SELECT THE OBJECTS THEMSELVES in the atrribute spreadsheet.

4. now go up to the Layer menu in the Attribute spreadsheet. Select "Create overrisde for selected.

5. Your items should still be selected. Now without clicking ANYTHING. Just type "on" or "off". and hit enter. DON'T use caps.It will create your layer override.

Please check "HELPFUL" below if it was, if not COMMENT below and tell me why! Don't miss another tutorial or tip! Subscribe to Maya Zest  

Maya Zest

The purpose of this blog is simply to post simple how to's that I have painstakingly figured out in Autodesk Maya. It will serve to jog my memory if I forget a particular technique and perhaps be helpful to you along the way. CG on chaps!!