
A UV pass is a totally sweet way you can modify your mapped 3D textures in POST in a compositing program like After Effects or Nuke. Rendering out a UV map pass with v-ray Maya is pretty easy. I'll try to be concise for you.
First create a 2d texture node in the hypershade.
Pull up your v-ray render settings. Render Elements tab
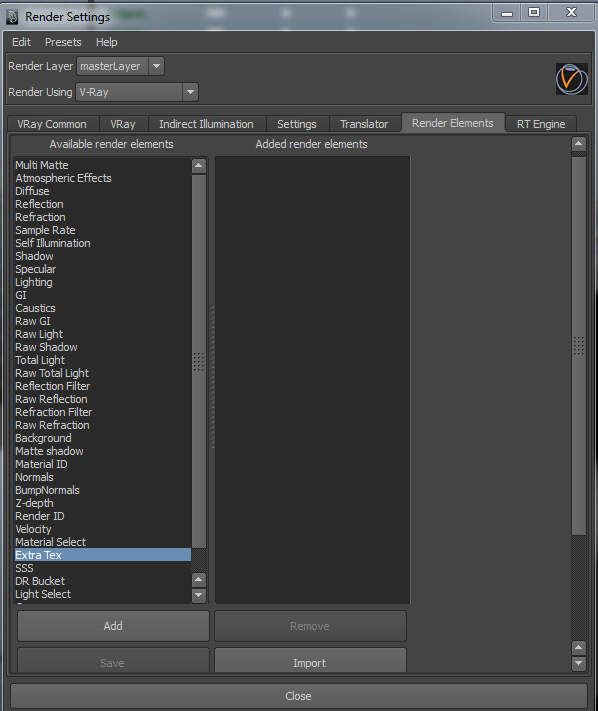
Select "Extra Tex" in the left and select "Add" in the bottom. Now if we select the newly created element in the right "Added render elements" column. We will see it's attributes in the attribute editor on the right.
Now in your hypershade middle click drag your place2d texture node to the Extra Vray Attributes>Texture input box and drop it on the checkerboard icon. (NOT in the box otherwise it won't bring up the connection editor) ALSO. Disable "consider for antialiasing" and "filtering" checkboxes.

The connection editor appears. We are connecting the R and G values.
Connect Place2dtexture1>outUV>outU to
vrayRE_Extra_Tex>vray_texture_extratex>vray_textur e_extratexR
Connect Place2dtexture1>outUV>outV to vrayRE_Extra_Tex>vray_texture_extratex>vray_texture_extratexG

Now we will have another pass to select when we render in the v-ray VFB.
Diffuse pass looks like this

UV pass looks like this

Last couple important things to consider.
The setup is really simple but there are a few things to watch out for. If your UV’s are distorted, then your textures are going to be distorted. So you need good UV’s. If you’re using simple rectangular billboards, make sure the UV’s are normalized (you can normalize UV’s in the UV Texture Editor).
Also, you will get the best image quality if you render this pass out at 32-bit floating point.
ALSO VERY IMPORTANT, SET PRESERVE RGB for the UV map layer in AE or it will not work!
Lastly, if you are using a linear workflow when you render it’s easy to mess up the render and end up distorted textures. This UV mapping pass should NOT be gamma-corrected in any way, so disable any lens shaders set your gamma to 1.0 and turn off “linear workflow” if you’re in VRay.
Please check "HELPFUL" below if it was, if not COMMENT below and tell me why! Don't miss another tutorial or tip! Subscribe to Maya Zest