Autodesk Maya, Unity, VR, Playmaker, Blender, After Effects and V-ray for Maya tutorials, tips and tricks
Search Maya Zest
Saturday, June 30, 2012
Creating Fast Rendering Sparks with Maya nparticles
This tutorial will show you how to make good looking and fast rendering sparks you can composite into your shots.
Tuesday, May 29, 2012
Create UV mapping pass in v-ray for Maya
A UV pass is a totally sweet way you can modify your mapped 3D textures in POST in a compositing program like After Effects or Nuke. Rendering out a UV map pass with v-ray Maya is pretty easy. I'll try to be concise for you.
Monday, April 9, 2012
Creating realistic hair with V-ray for Maya Part 1
This technique will show you how to create relatively complex hair that looks realistic using only Maya's standard hair system and v-ray's very nice hair shader.
Ready to get started??
NOTE: For one step you will need the free xyshrinkwrap plugin from creative crash.
First model your hair volume with a polygon box modeling and press 3 to smooth it.
Ready to get started??
NOTE: For one step you will need the free xyshrinkwrap plugin from creative crash.
First model your hair volume with a polygon box modeling and press 3 to smooth it.
It may be helpful to model several different sections of your hair. Make sure these smoother polyshapes are basically EXACTLY as you want your hair contour as it's not very easy to change your curves later on.
Saturday, April 7, 2012
Creating realistic hair with V-ray for Maya Part 2
If you haven't already start with Creating realistic hair with V-ray for Maya part 1 If you have completed that one then let's get started!
This tutorial will begin assuming that you have created all your hair guide curves from the last tutorial already.
So the two important items we have to deal with now are.
1. Our Maya hair system - controls density, thickness, shape of each hair cluster
2. Our vray hair shader, controls the shading and light penetration.
First thing we need to do is work on our maya hair system settings to thicken it up. In your outliner select hairSystem1 to pull up it's settings in the attribute editor on the right. Most of the settings are fairly obvious as to what affect they will have. Here are my settings duplicate them.
Now let's update the v-ray shader settings to make her hair darker and silkier. Scroll down to the bottom of your hair attributes and click the arrow next to your v-ray hair shader to open it's attributes. (or just open your v-ray hair shader in the hypershade) Here are my settings.
Render now and you will see it is way to dark.
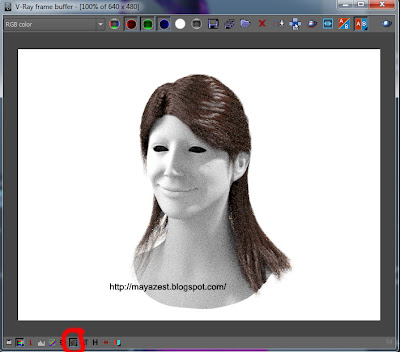
Let me show you why. We need to render in the v-ray VFB in your render settings VrayCommon tab under the Resolution rollout. Click show V-ray VFB. Now render your image in the VFB using the little teapot button. When complete select the little sRGB button in the bottom of the VFB to see what you have actually rendered.
Now create a cube in your work space. Select your cube and under the Dynamics menu subset in the top go to Hair>Create Hair. This will create a Maya hair system for you to use. Hair system1
Now select all your curves (you will probably have to UNGROUP them all first) and go to the menu hair>assign hair system>hairsystemshape1
Immediately this will apply the maya system to all your curves. If we render the hair right now it will look pretty bad.
LIGHTING SETUP: For this test setup I have a v-ray dome light set to white at 1.0 intensity with all other settings default. And one directional light at an angle set to 2.0 intensity and casting raytraced shadows from behind off to the right side. And one Rectangular v-ray light at intensity 15 off to the left somewhat close to the face and nearly as large as the face and neck. Set that up quickly and you should be getting similar renders.
Let's work on the hair now. Select your hair. Then in the attribute editor choose the top tab.hairsystemshape1
To add a v-ray shader attribute. Click atributes button >vray>hair shader
Now in your attribute editor scroll all the way down and expand the "Extra attributes" rollout. Click the checkerbox next to Vray Hair Shader to link a shader to it. In the pop up choose v-ray hair shader 3.
Now if we do a render we get something like this.
So the two important items we have to deal with now are.
1. Our Maya hair system - controls density, thickness, shape of each hair cluster
2. Our vray hair shader, controls the shading and light penetration.
First thing we need to do is work on our maya hair system settings to thicken it up. In your outliner select hairSystem1 to pull up it's settings in the attribute editor on the right. Most of the settings are fairly obvious as to what affect they will have. Here are my settings duplicate them.
With these settings it should look something like this.
Now let's update the v-ray shader settings to make her hair darker and silkier. Scroll down to the bottom of your hair attributes and click the arrow next to your v-ray hair shader to open it's attributes. (or just open your v-ray hair shader in the hypershade) Here are my settings.
Render now and you will see it is way to dark.
Let me show you why. We need to render in the v-ray VFB in your render settings VrayCommon tab under the Resolution rollout. Click show V-ray VFB. Now render your image in the VFB using the little teapot button. When complete select the little sRGB button in the bottom of the VFB to see what you have actually rendered.
Brightness is better but the image quality is really grainy.
UPDATED: Fixing this is a two part process first we must fix the gamma and color mapping. Go to your v-ray render settings Vray Tab, then go down to the color mapping rollout. Change the Gamma settings to 2.2 and make sure "Don't effect colors (adaptation only) IS ticked.
The advantage of ticking ‘Don’t affect colours (adaption only)’ is that the Gamma 2.2 will not be ‘burnt in’ to the final image, however V-Ray will proceed with all its calculations as though color mapping is applied. In effect this enables VRay to calculate better noise samples as it is sampling a brighter image, so the differences between light and dark tones are easier to detect.
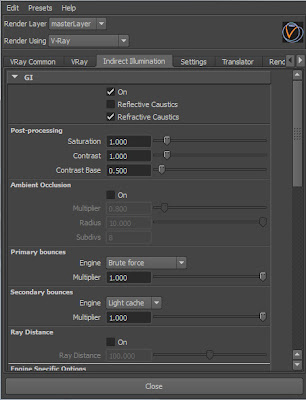
Now in your render settings Indirect Illumination tab turn on GI, primary bounces set to Brute force, and Secondary set to Light cache. Render again.
Everything is a little lighter and a little smoother.
At this point the main two factors effecting our grainyness are the sampling subdives on our dome light and the antialiasing samples. Make sure your are set to adaptive DMC under your render settings Vray tab, Image Sampler rollout and change max subdivs to 34
Render again, it takes a bit longer and things are significantly smoother. The remaining grain is from our dome light. Select it and change your sampling subdives up to 24 in it's attributes.
Now render an things are looking pretty good! I hope this gives a decent starting place for your hair. tweak the settings and experiment! Lastly I tweaked the color of the final render.
Thursday, April 5, 2012
Fixing your models symmetry or mirroring in Mudbox
Here is how to fix mismatching symmetry or mirroring in Mudbox.
First bring your model down to the lowest 0 subdivision level. Then change your tool in the bottom go to select/move tools. select the "faces" tool
Hit "w" to turn the wire mesh on your model on.
Friday, March 30, 2012
Interior Vertex has Valence two, locating vertex with only two edges. (Mudbox and Maya)
This is a bizarre little issue that I had never run into before. Hopefully if some of you run into it this will save you the time it took me to figure out. I was recently using Mudbox and when I imported my low res model from Maya I got this message "Interior Vertex has Valence two" in Mudbox. The solution is to locate the offending Vertex in Maya and get rid of it/them! Read on to find out how.
Wednesday, March 14, 2012
Simple displacement mapping in V-ray for Maya
This is not that difficult but there just doesn't seem to be that much information out there for Maya on this so I thought I would post a quick tutorial to help you out.
NEW UPDATE: If you are just trying to paint a simple greyscale displacement map in photoshop to place on your model this tutorial will show you how to do it, HOWEVER!
You will have far more CONTROL if you paint and export a floating point EXR displacement map in a program like Mudbox. This is because with floating point the displacement map's pixel values correspond directly to your 3D package's scene units. So a pixel value of 1.0 will displace your mesh by 1.0 scene units. A pixel value of 0.5 displaces your mesh by 0.5 scene units. And a pixel value of 0.0 doesn't displace your mesh at all. Further because the displacement map's pixel values are stored in floating-point format, they can contain pixel values far above 1.0, and negative pixel values far below 0.0. It's a great way to store precise displacement information.
A normal 16 bit image painted in photoshop doesn't have this ability so the tutorial below is limited. You may find yourself playing with the "displacement shift" and "displacement amount" settings trying to get perfect results because we aren't creating a floating point image. I have written a tutorial on using Ptex from Mudbox for displacement using V-ray for Maya here.
Saturday, March 10, 2012
Join the v-ray for Maya Facebook page!
Press the LIKE button to join the growing v-ray for Maya Facebook community! Share links, tips, your project etc.!
Wednesday, March 7, 2012
V-ray Maya Adaptive sampling/antialiasing tid bits
This was gleaned off a forum and posted by a user called PerfectLine. There is some very useful information in here if you are trying to figure out the DMC and Adaptive DMC sampling in v-ray for Maya.
Tuesday, March 6, 2012
Creating realistic grass in v-ray Maya using fur
Once again there are tons of tutorials for Max but not Maya about this kind of thing. Here is a quick tutorial which should give you a starting place for creating realistic grass in V-ray for Maya.
Let's get started! First, Create a new plane primitive.
Friday, March 2, 2012
Paint normal maps in photoshop! FREE plugin nDo
Man this week i'm just finding all kinds of little helpful tools I never knew existed. This tool let's you paint normal maps in Adobe photoshop directly! It's called nDo. This powerful tool has been released FREE!
Download nDo
Author Website Link
Here is the Polycount thread about it.
http://www.polycount.com/forum/showthread.php?t=77272
Please check "HELPFUL" below if it was, if not COMMENT below and tell me why! Don't miss another tutorial or tip! Subscribe to Maya Zest
Download nDo
Author Website Link
Here is the Polycount thread about it.
http://www.polycount.com/forum/showthread.php?t=77272
Please check "HELPFUL" below if it was, if not COMMENT below and tell me why! Don't miss another tutorial or tip! Subscribe to Maya Zest
Tuesday, February 28, 2012
UPDATED UV mapping tool (Maya)
I bumped into this UV mapping plugin for Maya is amazing and a lot of people are swearing by it. UPDATE: This tool is no longer free. it now costs $199 USD. It's still worth checking out.
UPDATE 2 Maya now has some pretty great UV mapping tools within the new modeling toolkit so you may not even need this kind of plugin anymore!
Check out this great tool!
Website
http://rd3d.com/dtools/?page_id=81
CG talk thread
http://forums.cgsociety.org/showthread.php?f=59&t=1035316&page=1&pp=15
Please check "HELPFUL" below if it was, if not COMMENT below and tell me why! Don't miss another tutorial or tip! Subscribe to Maya Zest
Monday, February 27, 2012
Free light IES files!
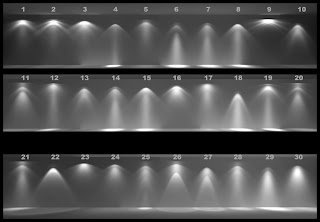
Look no further if you are trying to find some nice IES files for your interior 3D scenes. This pack of 30 lights should do the trick for your project. Download IES Files WEBSITE IS DOWN NOW SORRY

Please check "HELPFUL" below if it was, if not COMMENT below and tell me why! Don't miss another tutorial or tip! Subscribe to Maya Zest

Please check "HELPFUL" below if it was, if not COMMENT below and tell me why! Don't miss another tutorial or tip! Subscribe to Maya Zest
Saturday, February 25, 2012
V-ray for Maya and the disappearing VFB
I found a fix for users of V-Ray for Maya who are having problems with V-Ray’s VFB disappearing when you try to bring it up. I have no idea what causes this but it's an easy fix! Open your Maya ASCII file in a text editor I use Textpad and delete the VFB parameters.
Just search for the file for “VFB” and delete that set of data. Save as a copy and reopen in Maya and the VFB will work again.
Please check "HELPFUL" below if it was, if not COMMENT below and tell me why! Don't miss another tutorial or tip! Subscribe to Maya Zest
Monday, February 20, 2012
Scale or Transform ONLY selected faces from center of faces not entire object (Maya)
There is a little tool you have to select to scale only the faces from their own center and not the entire object. as shown in these examples.
Right click and hold in the view port choose "object select" in the quick menu. Select your object, then right click hold and go to faces selection. Select the faces you want to scale. Then in the top menu go to Edit Mesh>Transform Component.
(UPDATE THIS IS NOW CALLED SIMPLY TRANSFORM in the menu)
Please check "HELPFUL" below if it was, if not COMMENT below and tell me why! Don't miss another tutorial or tip! Subscribe to Maya Zest
Tuesday, January 10, 2012
Compositing Ambient Occlusion, AO from Maya, Max, XSI, etc.
This post by Zap on mental ray is just to good to forget so I have posted his theory image here for how to CORRECTLY composite your render layers. If you don't understand it please check out his blog post for the detailed explanation.
http://mentalraytips.blogspot.com/2008/11/joy-of-little-ambience.html
Please check "HELPFUL" below if it was, if not COMMENT below and tell me why! Don't miss another tutorial or tip! Subscribe to Maya Zest
http://mentalraytips.blogspot.com/2008/11/joy-of-little-ambience.html
Please check "HELPFUL" below if it was, if not COMMENT below and tell me why! Don't miss another tutorial or tip! Subscribe to Maya Zest
Subscribe to:
Posts (Atom)


