So you want to create some slick clouds in FumeFX for MAYA?
Basic steps of the tutorial:
1. Generate polygon cloud geometry using displaced noise on a group of combined spheres to get a nice broken up cloud shape.
2. Convert the displacement to polygons via modify>convert displacement to polygons.
3. Reduce the resulting polygon mesh to something manageable (100k polys or less)
4. Use the resulting object as a fume fx emitter.
1.First make a a collection of spheres either manually or using this
cloud creation plugin. Basically we just want a cluster of spheres that is roughly the shape of our cloud. Make sure there are both large and small spheres sprinkled about for good variation.
(If you use the spheres plugin it will generate nurbs and you will have to convert them to polys and then reduce it's poly count before use. )
UPDATE: Another cool way I just discovered to get your base cloud starting shape is to use maya fluids with a texture from my maya fluid clouds tutorial. on how to create maya fluid clouds. This actually works amazingly well!!! Then once you have a cloud shape you like simply go to modify>convert fluid to polygons). If you do this SKIP TO STEP 4.
2. Once you have a combined shape that is a single object of spheres apply a lambert material (reason for this is we are going to convert the displacement to polys and you can't do this if it's a vray material)
3. In your hyper shade create a displacement node. default click and drag a noise node onto your lambert material and Select displacement. Then create a noise node and middle drag it to the displacement node.
(REMEMBER MAYA DISPLACEMENT IS BASED ON OBJECT SCALE. if you have a large object you may not see your displacement. To remedy this select your displacement file node. Color balance and turn up the alpha gain setting till you see the displacement. Then you can refine the displacement smoothness and resolution by selecting the object you are displacing There should now be a Displacement Map drop down in the attributes for it. The vray displacement settings will NOT work anymore.)
If you try and use a fractal to drag onto the displacement node by default it will attach the alpha channel out and you won't get any effect. You can fix this by middle mouse clicking and disconnecting the alpha and attaching just one channel of R,G or B to the displacement node.
3. Now set your renderer to IPR so we can see real time updates of the displacement changes (make sure to turn on displacement in the Vray RT renderer) and start tweaking the noise parameters and UV mapping settings on your object. What we want is a big lump shape with small details and large billow details at the same time. you don't want ONLY either of those you want both.
This is going to effect the look of your clouds quite alot. If you have to many large smooth areas they will show up, if you have to small of details they will disappear into them ass and not be visible.
4. Once you have a shape you like. go to modify menu > convert displacement to polygons.
It may take a few minutes. The resulting object will probably be really polygon heavy. Go to mesh menu>reduce> settings square. Set it to 50% (or higher if you wish and reduce the obejct a couple times. Something below 100k polys or less should be good.
5. Now make your fume FX container select it then shift select your object and turn it into a object emmiter with the fume fx icon.
Now for the golden mojo cloud mix.
I don't have it perfect but after some experimentation I've come up with a decent recipi. use these fume
6. On your object emitter source attributes to source type volume. and turn the smoke amount up to 10.
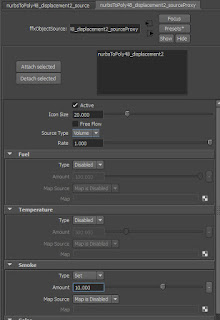
On your emmiter source also change turbulence to these values:
Velocity
Object - 1 (doesn't matter)
Extra - .001 (for very slight cloud expansion over time, if this is set to 0 you will have a perfectly static cloud.)
Turbulence
Amount .5
Scale 10
Frames 3
7. Then use these settings in your fume FX container. I'm only mentioning the ones. Turn off fuel.
GENERAL PARAMETERS:
Spacing .3 (work it down to .2 later)
Set your container size toe contain your object and set it to adaptive.
SIMULATION:GENERAL
leave as default
SIMULATION:SYSTEM
Gravity .1
Vorticity .5
Velocity Damping 0
X turb .9
Y turb .1
Z turb .5
SIMULATION: TURBULENCE NOISE
Scale 2
Frames 10
Detail 2
SIMULTION:SMOKE
Simulate Smoke : ON
Smoke Boyancy .2
Dissipation Min Dens 10
Dissipation strength .1
Diffusion 0
Additional smoke rendering settings.
Lastly in illumination> illumination map set multiplier to 4. (this is from the fume fx vray maya documentation.)
If all goes well you should get a render that looks something like this.
Turn on do Multiple scattering under Multiple Scattering. leave settings as is. Add a single directional light.
These are both rendered at .3 spacing and took 55 seconds on a 40 core dual xeon @ 960x540
45 seconds
1.5 minutes
Hope you enjoyed this tutorial. If it helps you drop me a line in the comments please!


