Autodesk Maya, Unity, VR, Playmaker, Blender, After Effects and V-ray for Maya tutorials, tips and tricks
Friday, December 8, 2017
Create handheld camera shake After Effects with a simple wiggle expression.
You can use a simple wiggle expression on position to emulate some nice camera shake in after effects very easily.
The first two properties supplied to wiggle (frequency and amplitude) are required for the expression to work, the rest of them are optional. If you supply a value for the 3rd property in the wiggle you can increase the number of octaves from the default:
wiggle(1, 10, 3);
You can pull up the graph editor to see the wave form that is created!
The above, for example, will wiggle with a frequency of 1 Hz, an amplitude of 10 but with 3 octaves. This is similar to the "Complexity" of the Fractal Noise effect. It will preserve the overall effect of the wiggle but create additional "sub-wiggles" that add detail.
Here's an image of a wiggle() with 1 octave:
And here's a wiggle() with 3 octaves:
Note that both curves follow the same basic path, but the one with 3 octaves has more "sub-wiggles." If you want to reduce or increase the effect that these additional octaves have you can add a 4th property to wiggle():
wiggle(1, 10, 3, 0.2);
The default value is 0.5. A value of 0.2 would reduce the effect that the additional octaves have on the total wiggle.
For more control functionality you can create a slider control and then pick whip from one of the numbers in your wiggle set to the slider control, to make keyable changes in the motion.
Special thanks to Darby Edelen, I gleaned this from a forum post he made.
Thursday, November 9, 2017
After effects fade in and out expressions
Just alt click on the little clock for the opacity of the layer you want to fade on the in and out points of your layer and paste these expressions.
FADE on IN and OUT
fadeInTime = .5; // fade in time (seconds)
fadeOutTime = .5;
Math.min(linear(time,inPoint,inPoint + fadeInTime,0,100),linear(time,outPoint - fadeOutTime,outPoint,100,0))
FADE on IN and OUT
fadeInTime = .5; // fade in time (seconds)
fadeOutTime = .5;
Math.min(linear(time,inPoint,inPoint + fadeInTime,0,100),linear(time,outPoint - fadeOutTime,outPoint,100,0))
JUST FADE ON OUT
if(time<(this_layer.out_point -0.5)){
transform.opacity;
} else {
( (this_layer.out_point-time)/0.5) * transform.opacity;
}
Friday, September 1, 2017
MEL Code to change filter type of all your images/textures (MAYA)
Sometimes you might want to turn of the texture filtering for ALL textures or ALL SELECTED textures in your maya project. This is because the default filtering method (quadratic) can lead to very soft or smudgy textures.
Paste one of these scripts into your script editor with MEL selected. Then highlight the code snippet and press the play button to execute.
// Sets filter type to "Off" on ALL file textures
string $fileList[] = `ls -type "file"`;
for ($file in $fileList){
setAttr ($file + ".filterType") 0;
}
// Sets filter type to "Off" on selected file textures
string $fileList[] = `ls -sl -type "file"`;
for ($file in $fileList){
setAttr ($file + ".filterType") 0;
}
Start Multiple instances of After Effects CC
So you might have noticed if you try to start another instance of after effects nothing happens. There is a little trick to start more copies.
1. Start AE, then start your windows task manager. Go to the processes tab. You should see AfterFX.exe Right click on that process and at the top of the popup list say "open file location"
2. This will open an explorer window with afterFX.exe selected. Right click on it and select "create shortcut"
3. Right click on the shortcut that is created and go to "properties" at the bottom.
4. In the target field at the very end put a space and then -m
Make sure you put a space or it will give an error.
That's it it should let you start multiple copies of AE now!
Wednesday, August 30, 2017
Media player to replace quicktime on windows (NOT VLC)
So after searching around for a bit since quicktime doesn't seem to hardly work in windows anymore I needed a player that can both frame by frame, be light weight, and play MOV's etc. Everyone talks about VLC but it doesn't frame by frame very well at all and honestly I think it looks awful. Windows media player is clunky as heck and often won't even play mp4, or MOV files.
Enter smplayer. You can frame by frame with the < > keys , .
Under preferences you can go the interface tab and change it to mini GUI, so that the icons aren't so big and clunky. you can turn off the top tool bar.
You can tell it to allow multiple instances under Options>Preferences>interface> instances tab.
So overall it seems light and tight like quicktime was, I have my frame by frame functionality and it doesn't look like it came out of some geeks pocket protector (well mostly :) If you tune up the interface a little.
Enjoy!
smplayer
http://www.smplayer.info/en/info
UPDATE on QT codecs: also just FYI if you are having issues with quicktime you may also be having issues with the quicktime codecs. For instance in maya I couldn't get QT for playblasts since QT won't even install. I downloaded this quicktime alternative and it did the charm perfectly.
http://www.free-codecs.com/download/quicktime_alternative.htm
Tuesday, August 29, 2017
Make an object or shadow follow/parent only on one axis after effects
Let's say you want the y axis to stay fixed but you wanted the object to translate along x with another layer or object. For instance the shadow for a bouncing character.
Start with code something like this in the position expression for your object that needs to track your "parent object" Set y to the desired fixed vertical height.
y = 900;
x= ;
[x,y]
Simply Click to the left of the semi colon after x= then pick whip to the x position of the object you want it to follow.
The code should update to something like this.
y = 900;
x=thisComp.layer("name of your layer").transform.position[0];
[x,y]
Now it will follow along with your object only on one axis!
Monday, August 14, 2017
Text antialiasing in Chrome not working
I have no idea what caused this issue. But somewhere along the line I found that the fonts in chrome suddenly looked TERRIBLE. Like no anti aliasing what soever. Jaggity mess.
You can adjust clear type text. from your windows search bar (find it there) and turn that on but that seems to only effect windows fonts. After some more digging I found that it's a little setting in chrome you have to turn on.
Go to chrome://flags/
Search the page for "LCD text antialiasing." Then set this to "ENABLED"
This fixed it for me! how incredibly annoying.
If you still have the problem you can also try this.
Search the page for "GDI Text Printing" Then set this to ". "ENABLED"
Thursday, August 3, 2017
3 Quick After Effects Productivity tips
I'll keep growing this list as I come across little tibits that help. In the mean time feel free to comment with a quick tip of your own and i'll add it to the list.
TIP 1 - How to resize or change the color of a solid after you've already created it.
Simply select your solid layer and press Shift-CTRL and Y. It will pull up the dialog box so you can change the color and size of the solid.___________________________________________________________________
TIP 2 - Link two text layers content together with expressions
If you want to link multiple text layers to one in AE so that you change one text layer and it will change the letters in the linked layer(s). This can be really helpful if you have an effect that relies on many layers of text all working together. For instance if you have a typo you need an easy way to change them all at the same time.HERE IS HOW - Expand the text you want to link to a master text layer until you see text>source text. ALT click the little clock by "source text" to open up the expressions for it.
Now on the layer you want to link the text two expand it as well so that "source text" is visible
Now in the slave text layer use the little pickwhip icon and drag it to where it says "source text" in your master layer. (it won't work if you juts try to place it on text or the text layer)
NOTE: This will not sync the font px size, those would still have to be synced manually.
____________________________________________________________________________
TIP -3 Scale the selected layer to fit in your composition window
This is stupid but I always forget the hot keys so I figured i'd post it. To scale the layer to fit in your composition window use these hot keysCtrl+Alt+F - Fit All
Ctrl+Alt+Shift+G - Fit Vertical
Ctrl+Alt+Shift+H - Fit Horizontal
Friday, July 28, 2017
Working with Arri alexa LOG C footage in after effects
Here is a quick tip about how to properly use Arri log C footage in after effects!
1. First set your after effects project settings to
32 bit Float and working space to sRGB IEC61966-2.1
2. Then import your footage into after effects
Now right click and press interpret footage on your shot or image sequence. Go to the color management tab.
Tick the little empty check box "Show ALL available Profiles"
And then for assign profile choose "Universal Camera Film Printing Density"
3. Click ok.
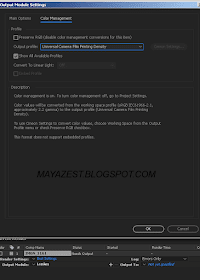
Now your video should display properly and be alot easier to work with. Now when we export we need to still use that same "Universal Camera Film Printing Density" setting in the export module.
That should do it!
Thursday, July 27, 2017
It's been a while since I posted but here's why...
Hi folks! For those of you who don't know I work as a VFX Supervisor and I got wrapped up in a BIG vfx project called Woodlawn for the last year.
I supervised a team of hand picked artists to create digital crowds for over 350 stadium shots. Many of which contained 25,000-50,000k digital people. We used a plugin called goleam for maya and rendered the crowds with vray for maya.
At any rate I got so busy I neglected posting to my tips blog,
If you are interested here is a short vfx reel showing some of the work we did.
https://vimeo.com/144819977
Here is the article about the project on Goleams website
http://golaem.com/content/news/red-sky-studios-creates-amazing-crowds-budget-with-golaem
VFX isn't easy... keep plugging everyone. Thanks for visiting my blog :)