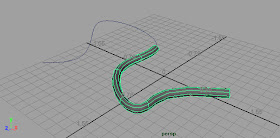
There are a number of tutorials on the web for animating a growing vine, tube or rope along a path. I noticed however that steps are sometimes left out which might make it difficult for some to accomplish the effect. Here this is the process I went through to make it work.
1. Create a nurbs curve for your vine to follow, Menu Create> Ep curve tool then draw your EP curve line in your work space. Next create a nurbs circle menu create> NURBS primitive> circle
2. Position the circle at the end of your NURB curve. Select the circle and THEN the curve (in that order), then go to surfaces>extrude [option box]
3. In the Extrude Options panel, make sure that you change the “curve range” setting to “Partial”, and hit “apply”
4. Set your timeline to frame 0. Select the newly created nurbs surface, and then (in the channel box) select the subCurve1 or subcurve2 node that corresponds to the length of the curve.
5. Keyframe the "max value" attribute to 0 by RIGHT clicking directly on the "max value" header in the channel editor and selecting "key selected"
IMPORTANT: Max value: 1 equals full length. .5 equals half. 0 equals no length.
6. Change your frame to 24 in the timeline then "Key selected" in the max value to 1
Now over 24 frames the tube will grow in length.
If you want a NURBS surfaces to control a poly tube do the following:
IMPORTANT: Max value: 1 equals full length. .5 equals half. 0 equals no length.
6. Change your frame to 24 in the timeline then "Key selected" in the max value to 1
Now over 24 frames the tube will grow in length.
If you want a NURBS surfaces to control a poly tube do the following:
1. Select any isoparm on the NURBS surface, and go to edit nurbs > offset > offset curve [option box]
2. Change the Offset distance value to zero, and hit “apply”
3. Create a poly surface (plane, cube, sphere, etc)
4. Select a face or group of faces on your poly surface, then shift-select the animated curve that you offset a few steps back
5. Go to edit mesh > extrude (option box), and make sure that the use selected curve for extrusion option is checked
6. With the poly surface selected, select the polyExtrudeFace node in order to increase divisions, lower taper value, add twist, etc
Please check "HELPFUL" below if it was, if not COMMENT below and tell me why! Don't miss another tutorial or tip! Subscribe to Maya Zest
Please check "HELPFUL" below if it was, if not COMMENT below and tell me why! Don't miss another tutorial or tip! Subscribe to Maya Zest